Changelog
Follow up on the latest improvements and updates.
RSS
Here are the new features for November, and how to use them:
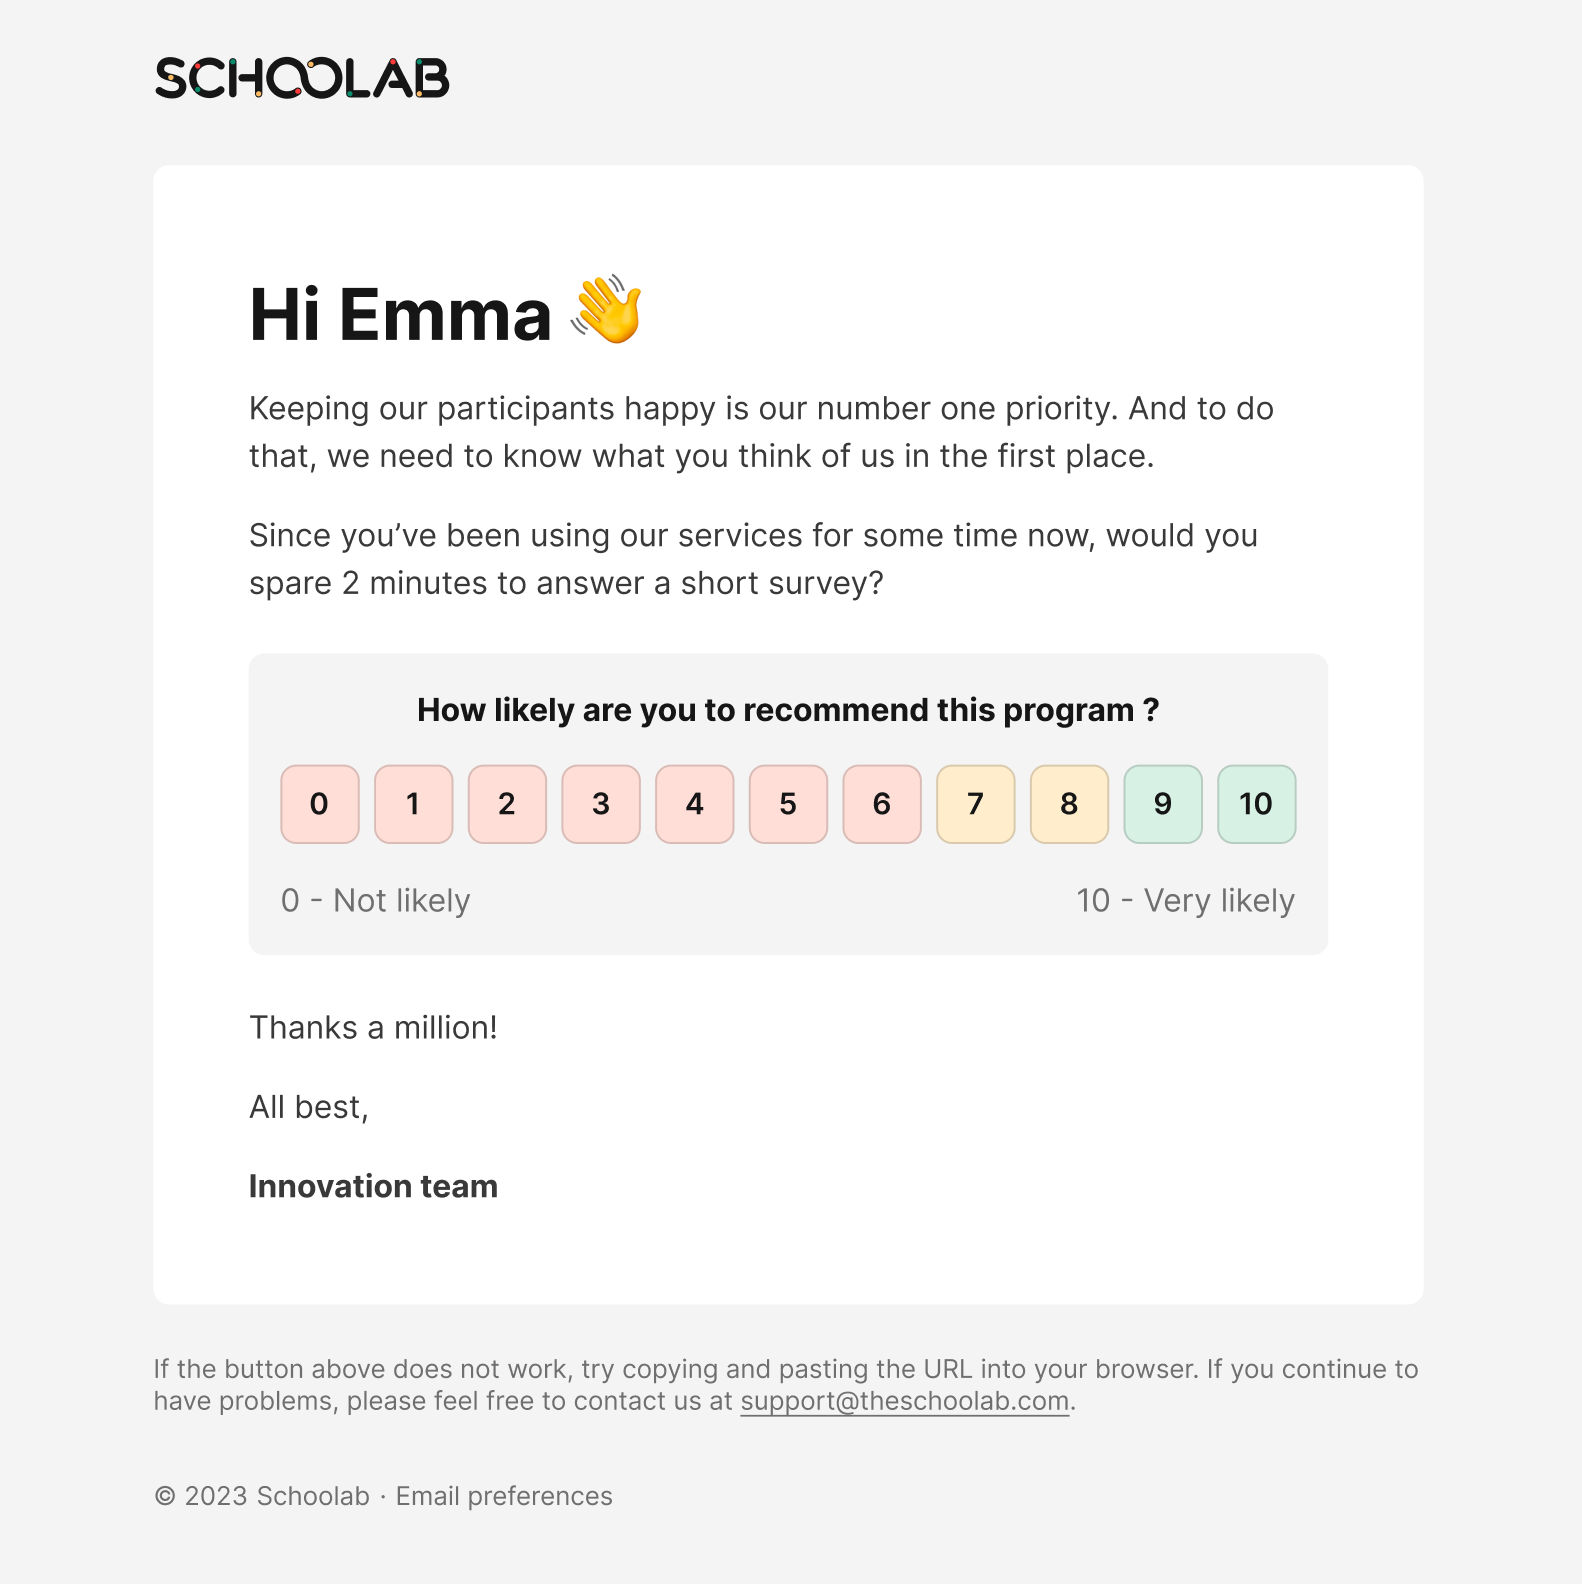
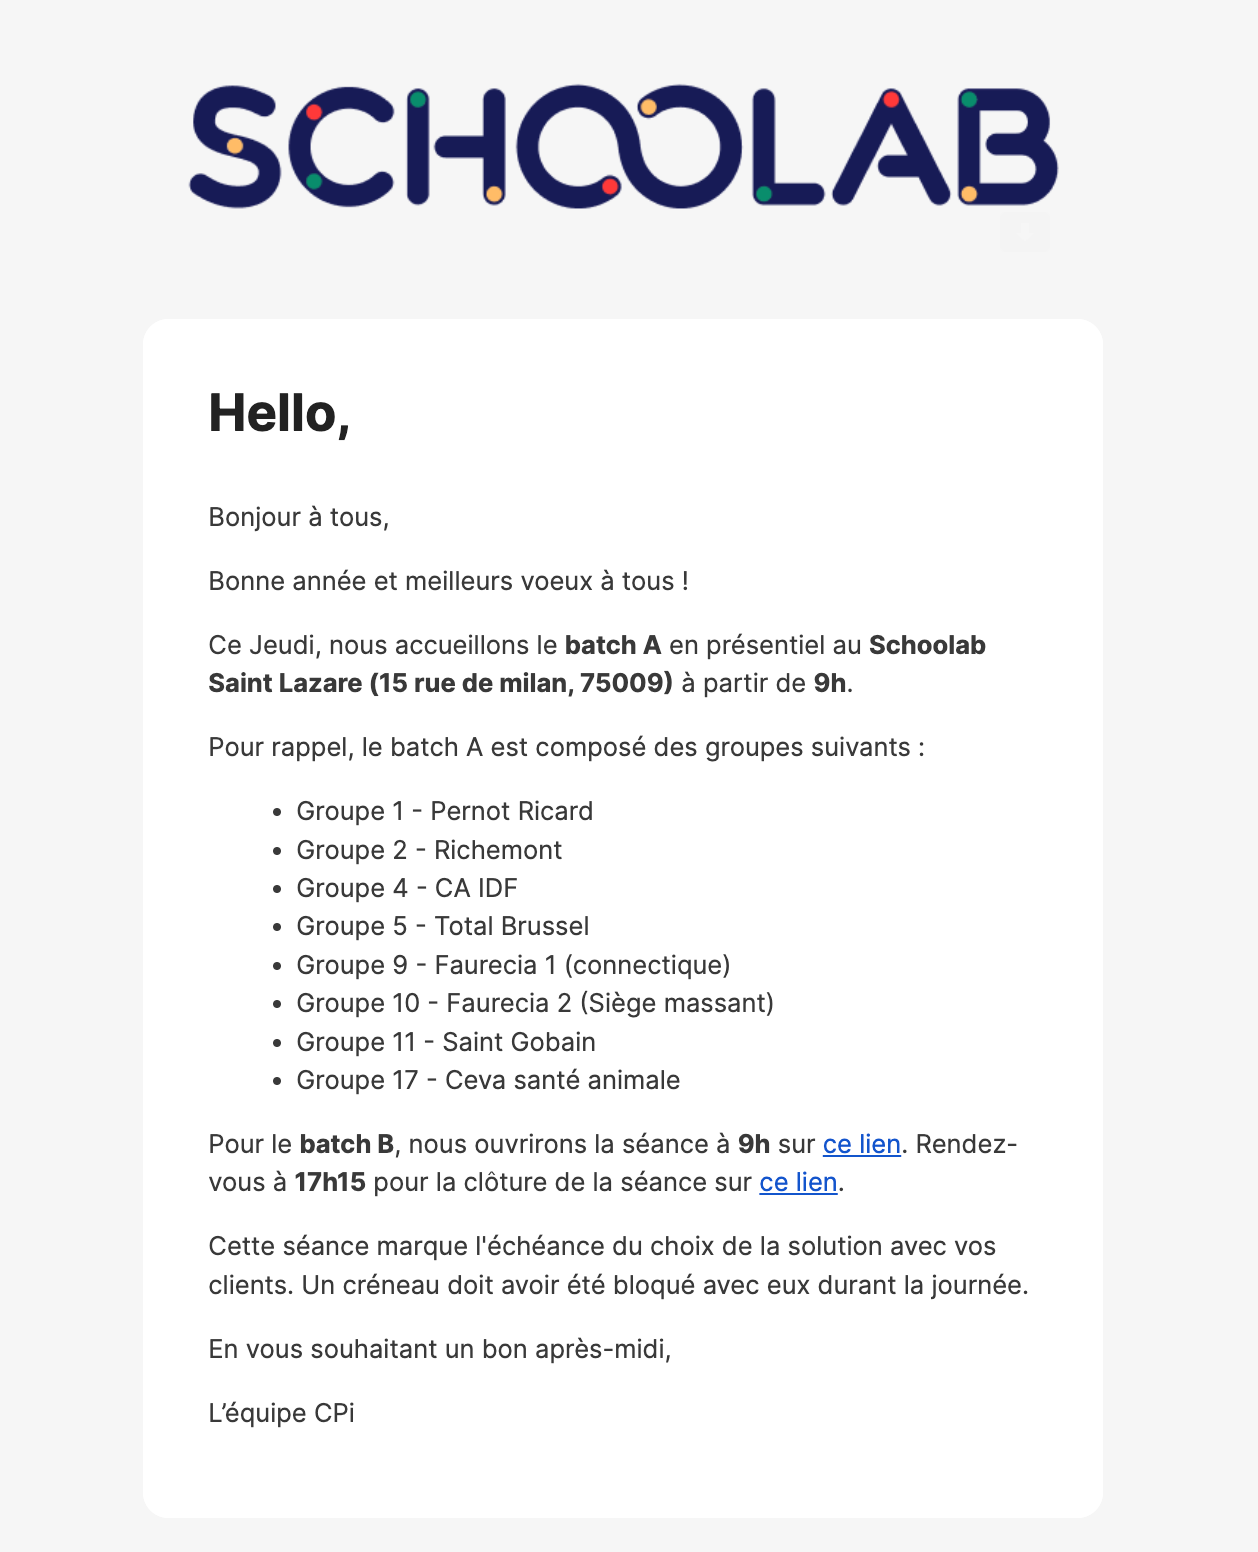
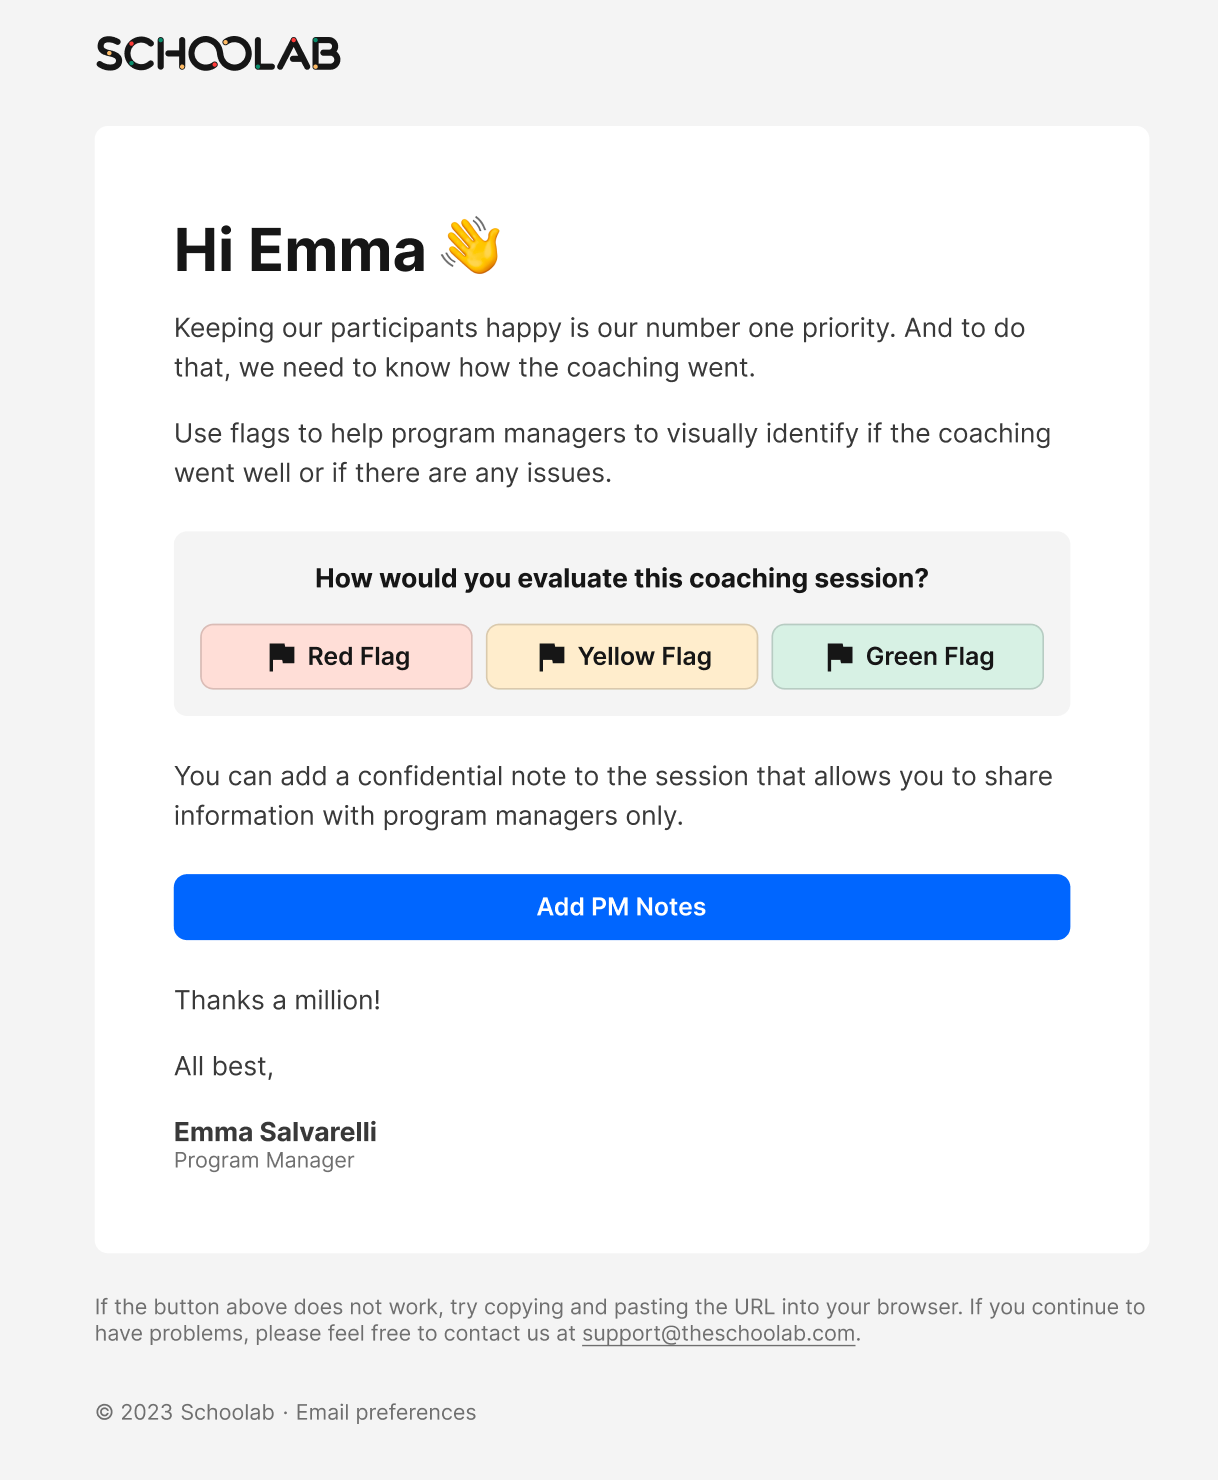
New email designs
We reworked the architecture of the automatic emails to make them more readable and increase user interaction with the emails sent.
Here are a few examples:
👉
NPS
: 
With several solutions depending on the response:
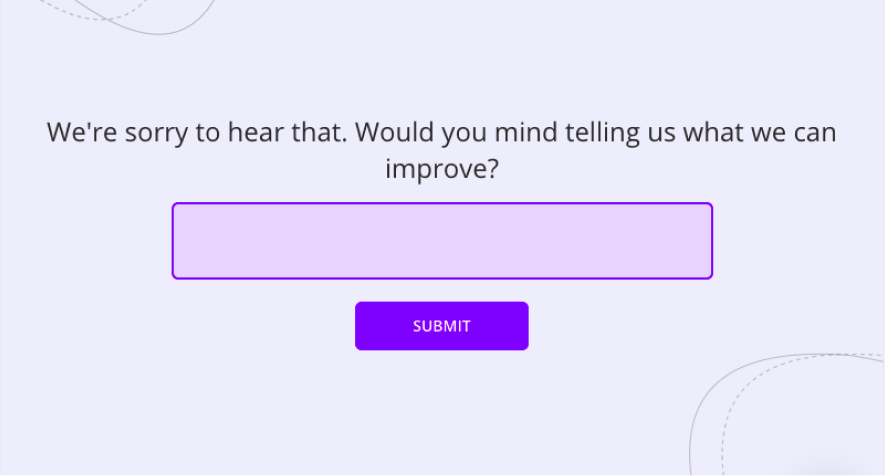
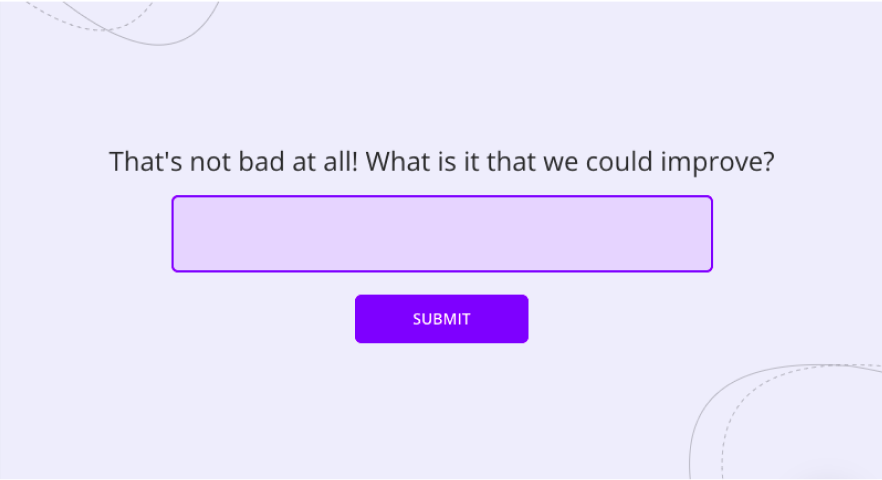
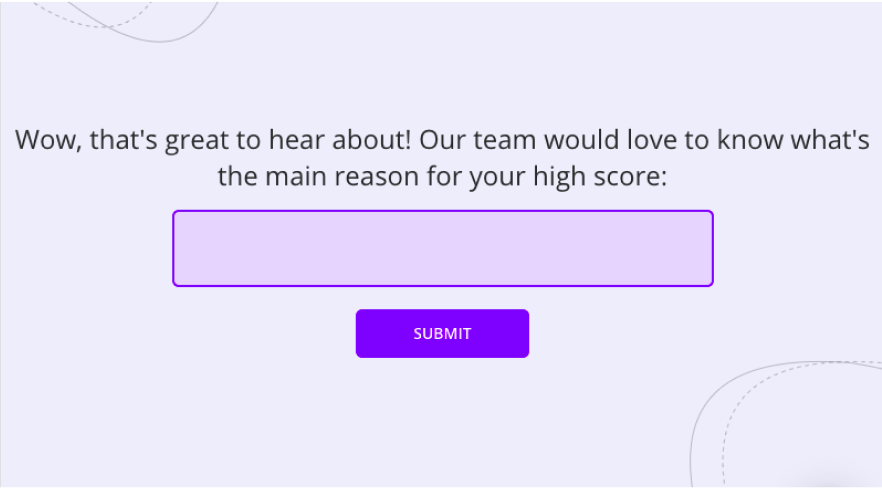
👉 Newsfeed messages:
👉 Messages following an evaluation session:
Here's a rundown of the latest new features in recent months:
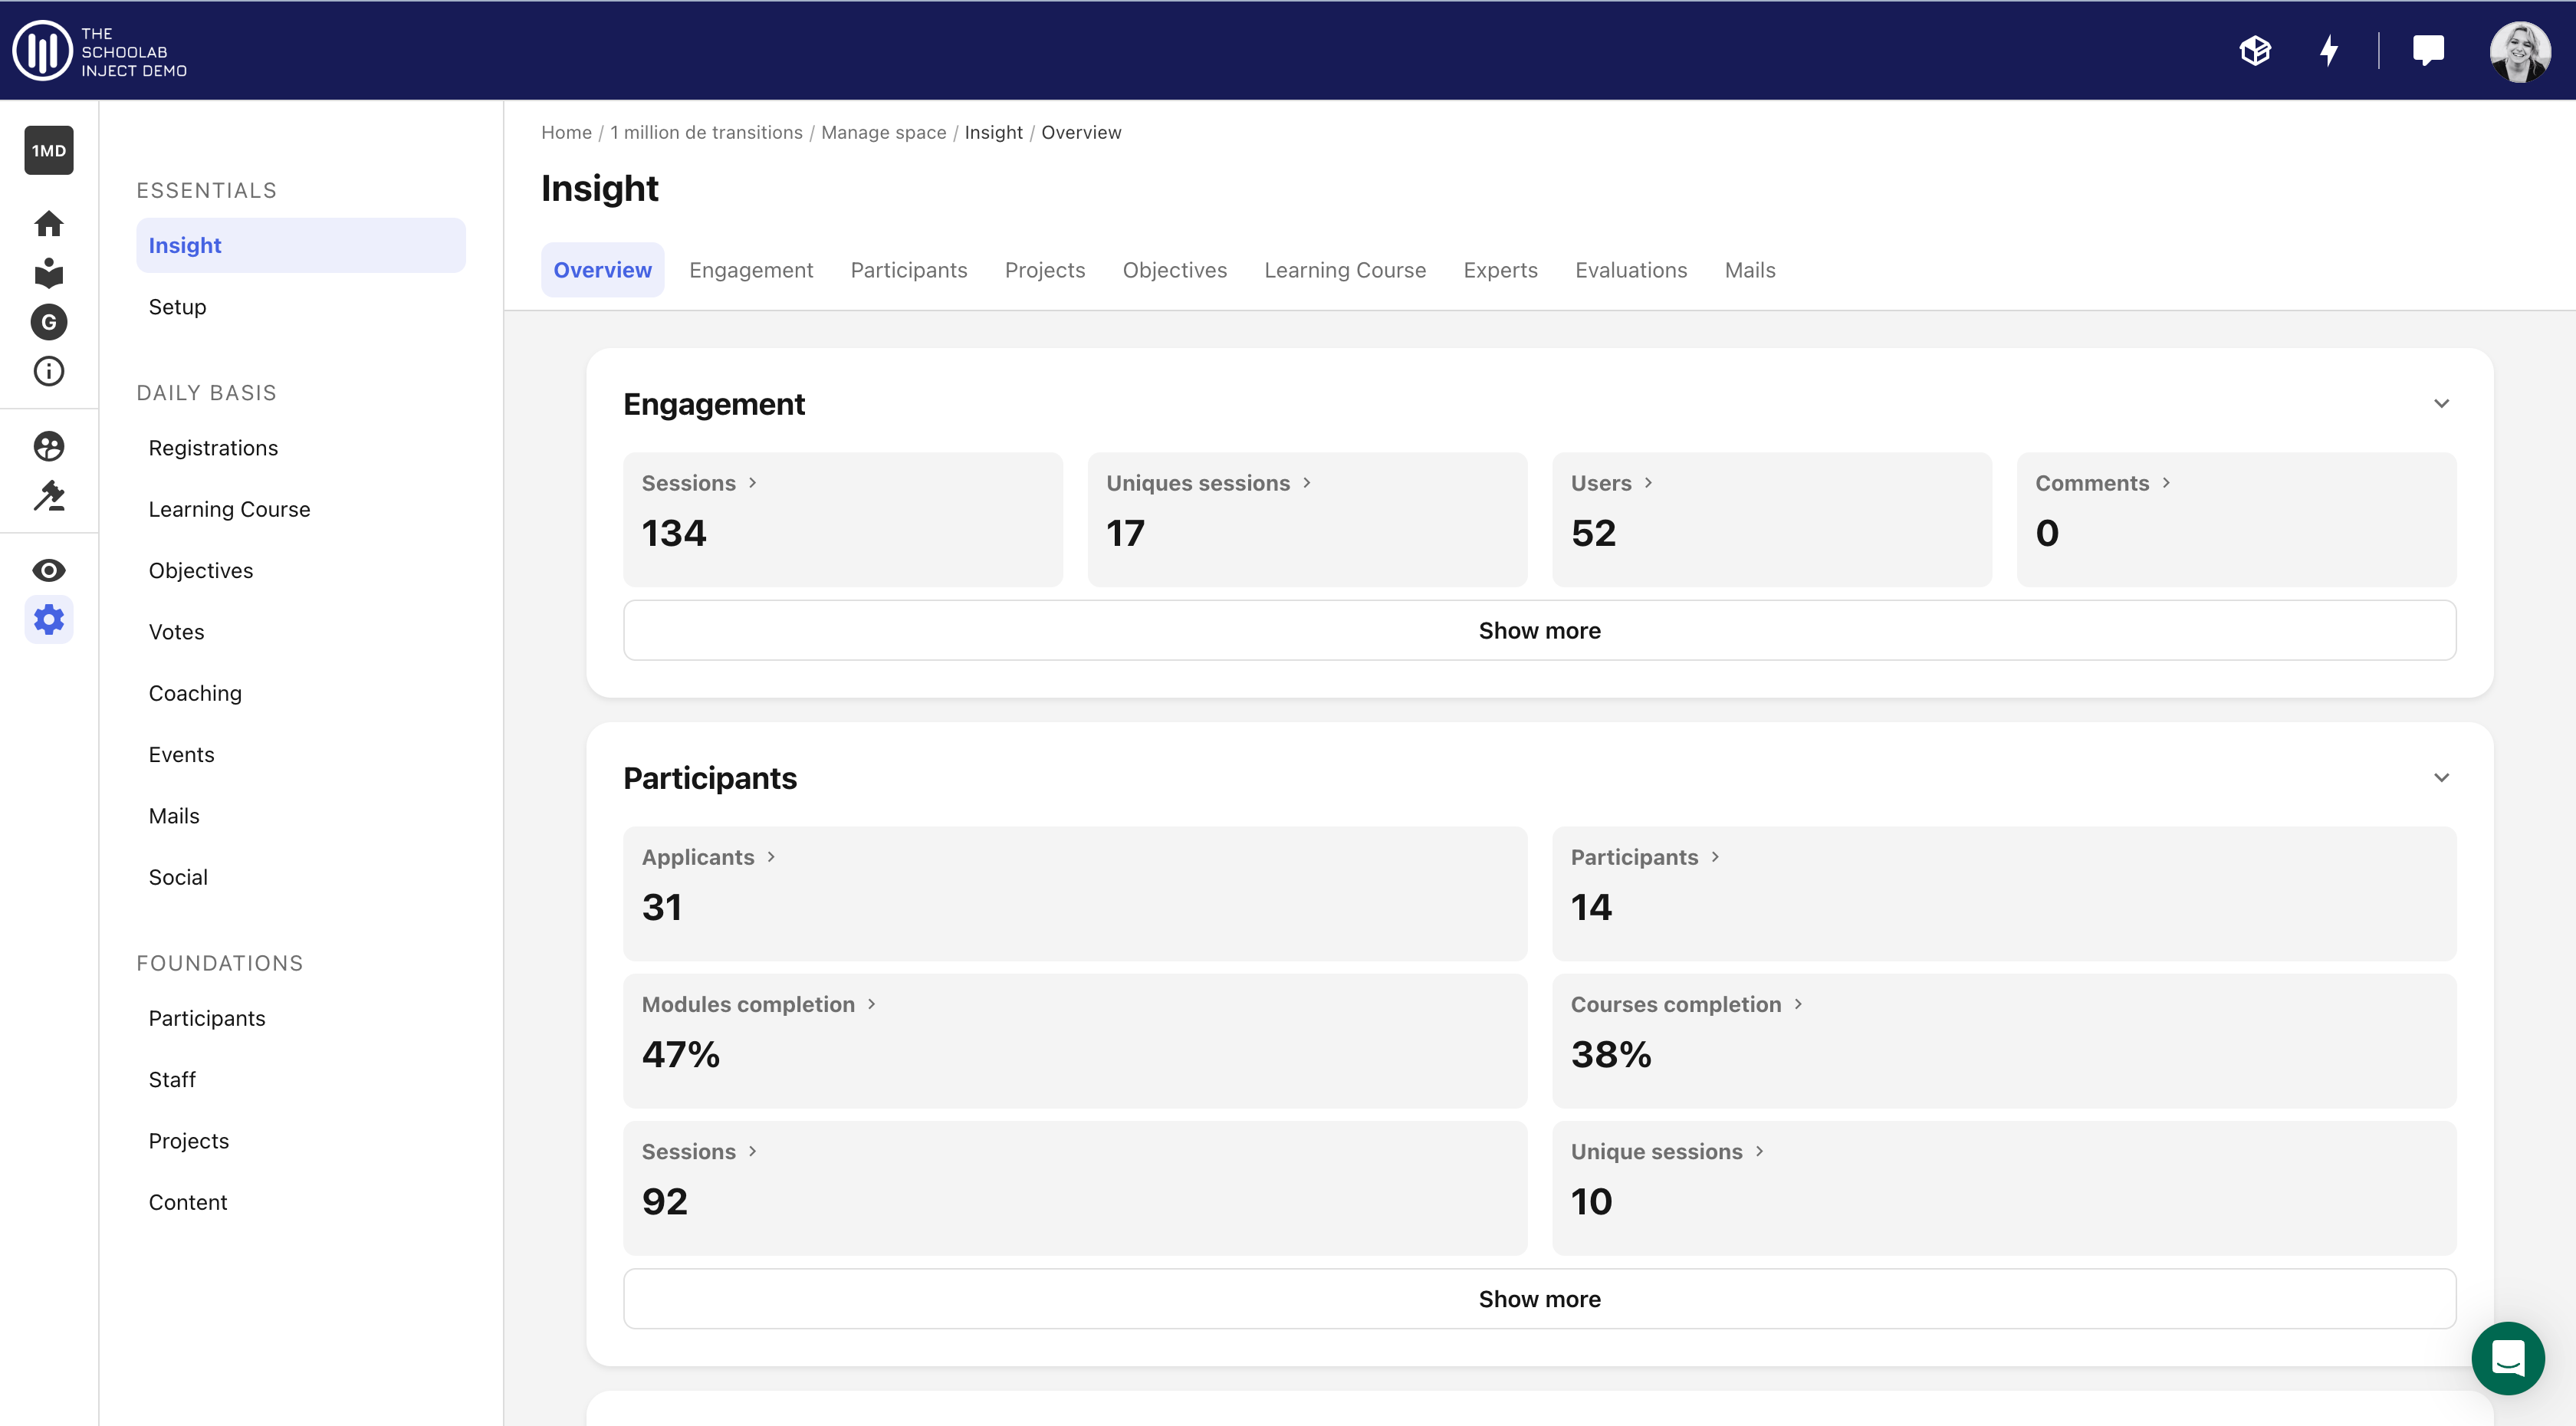
1/ The completely restructured Manage area:
To simplify use of the platform, we've reworked the structure of the manage area. Previously, features were listed by user, but now you'll find them listed by key program action.
👉 For more information, go here
-
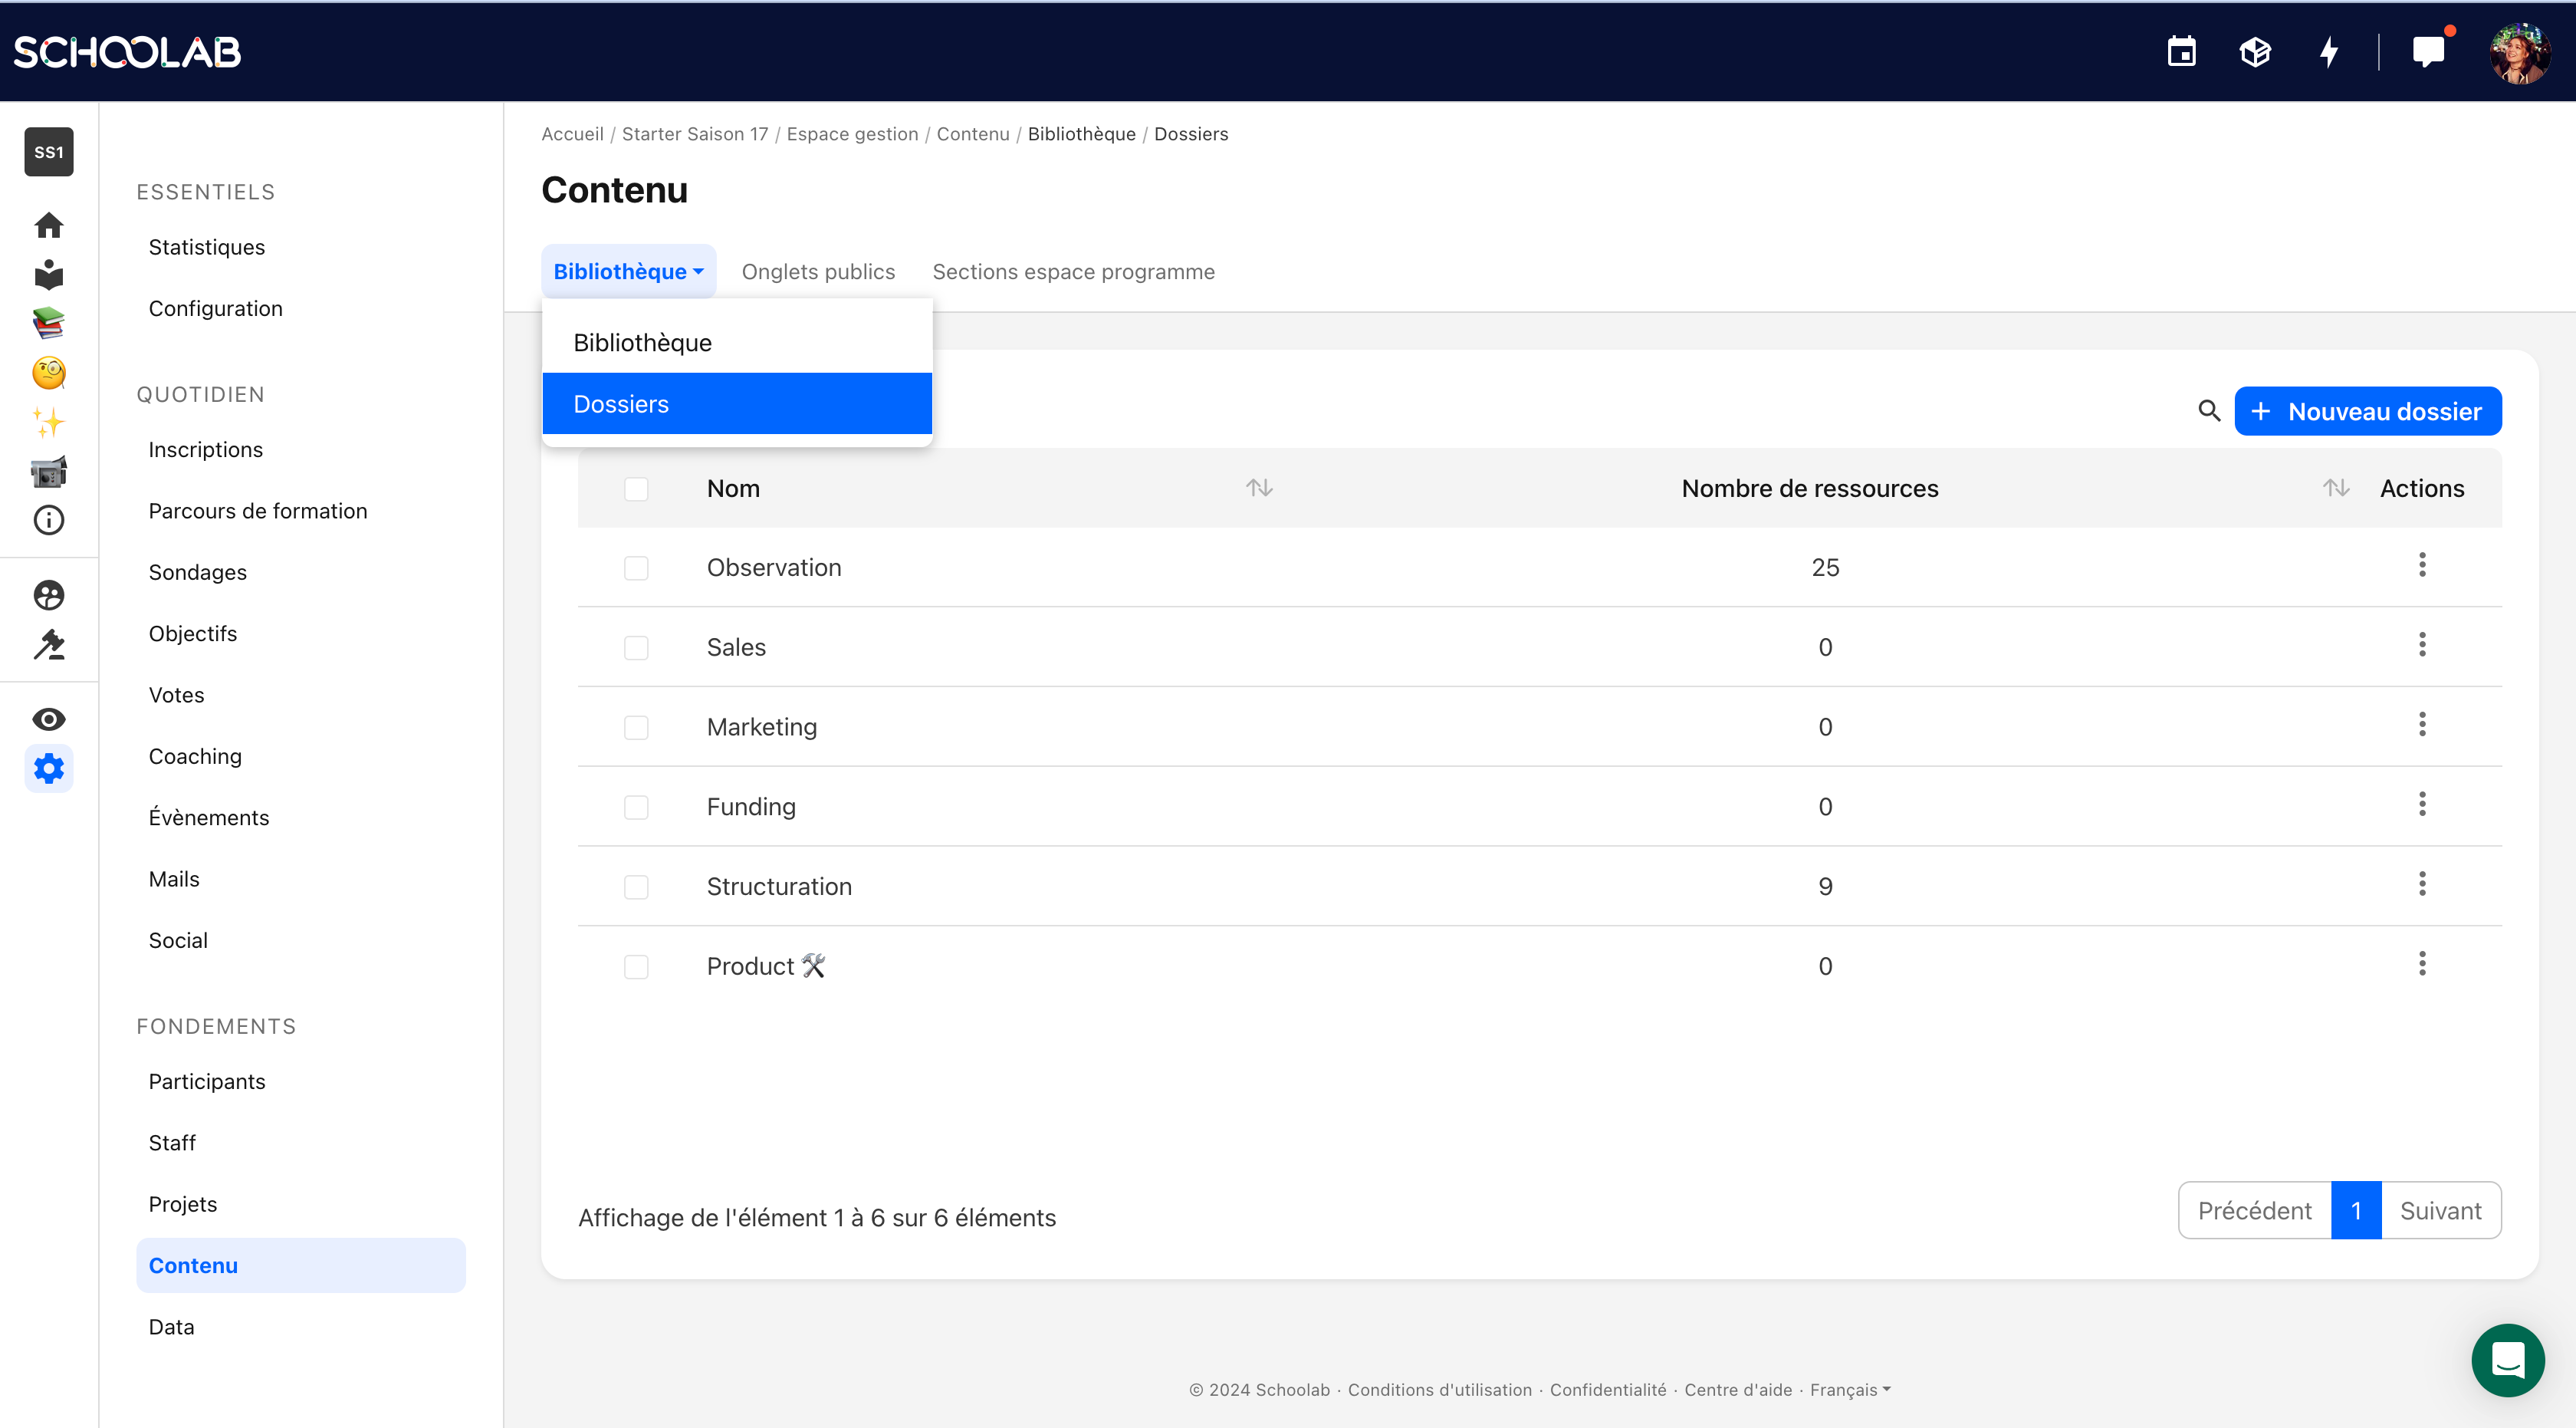
2/ A library on the move
To improve the organization of the bookshop, we have introduced the possibility of creating folders in the bookshop.
To do this, simply go to the "manage program" section, then in the "content" section click on the "folder" sub-tab. Simply create your folder before adding new or existing resources.
👉 For more information, click here.
-
3/ Create segments and offer them surveys
Another new feature:
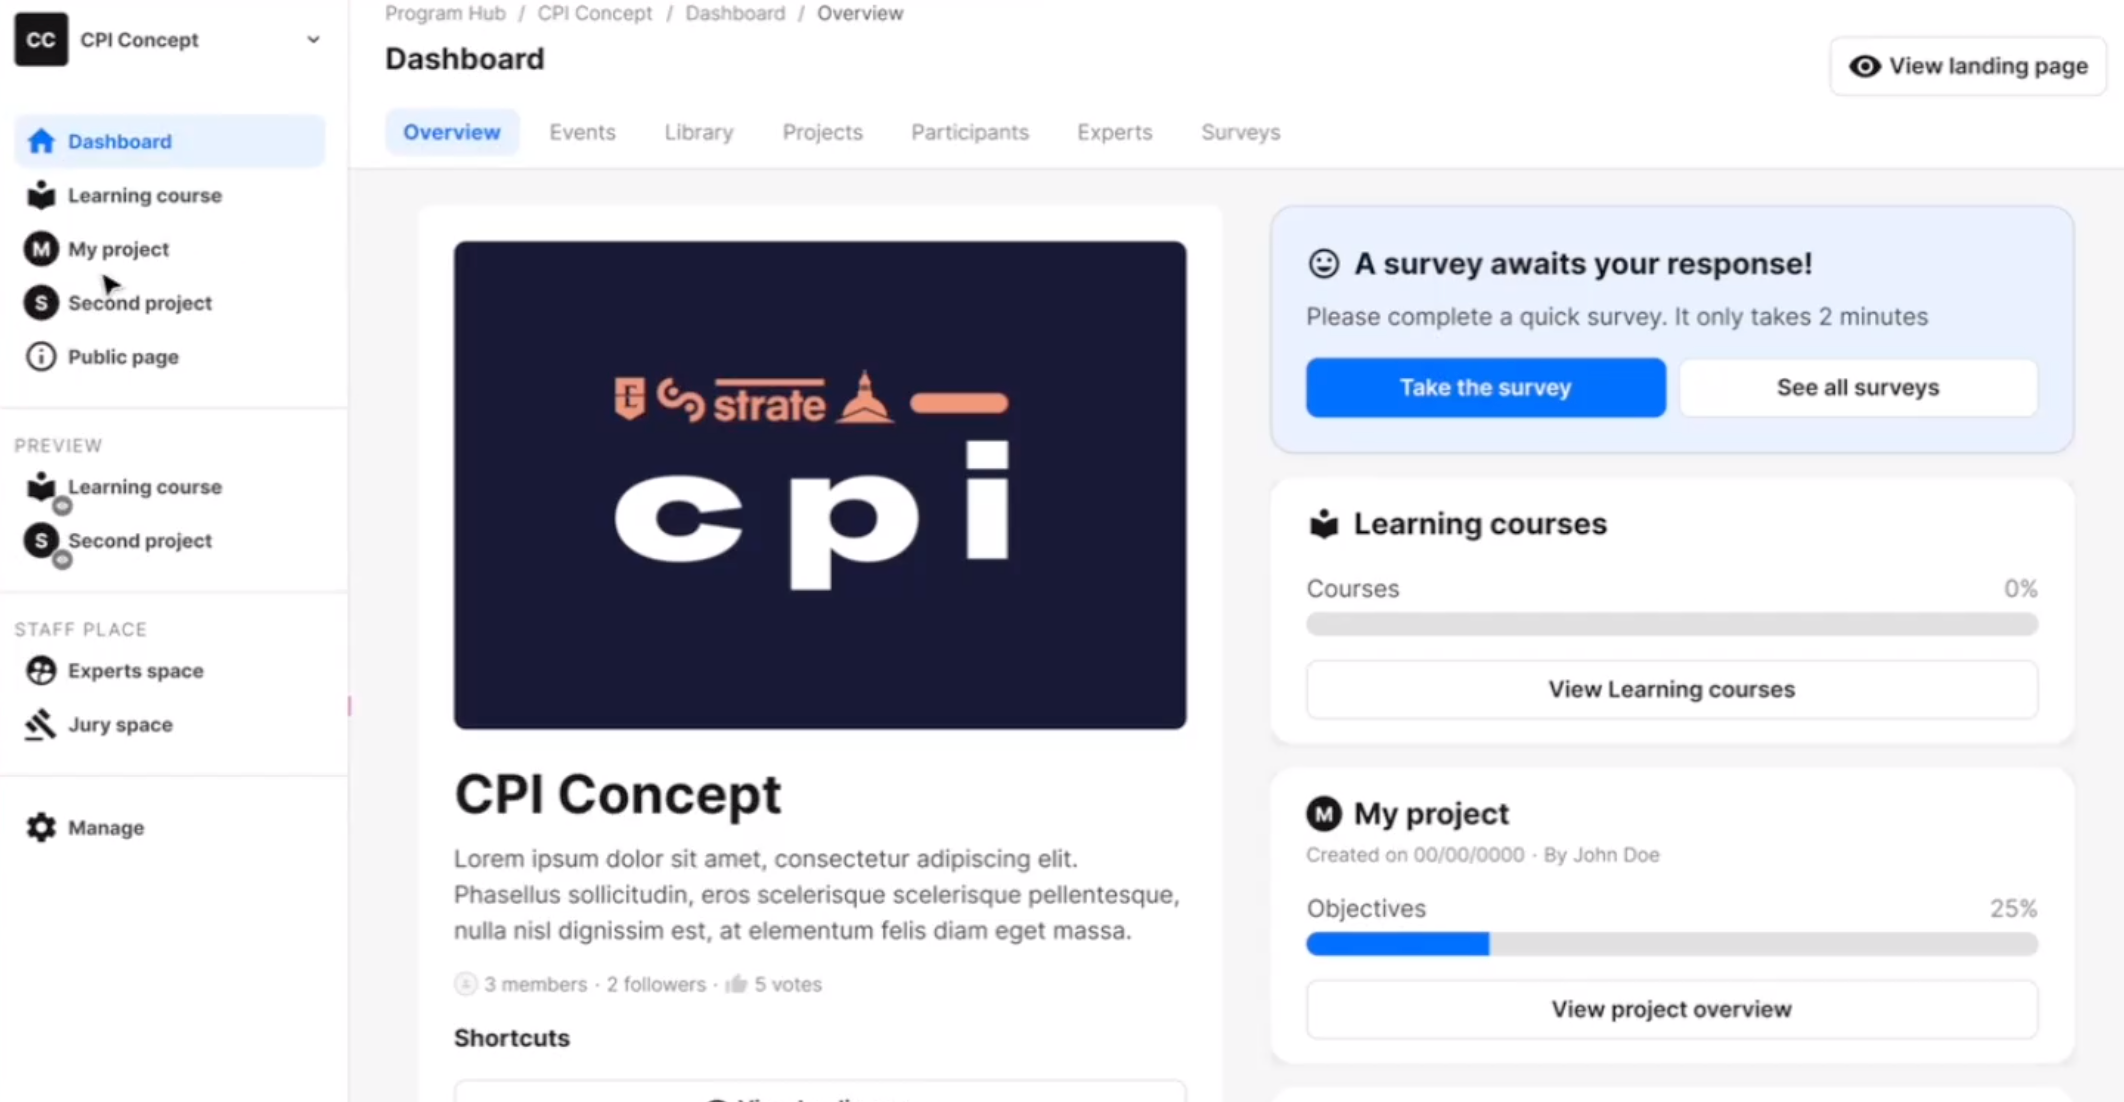
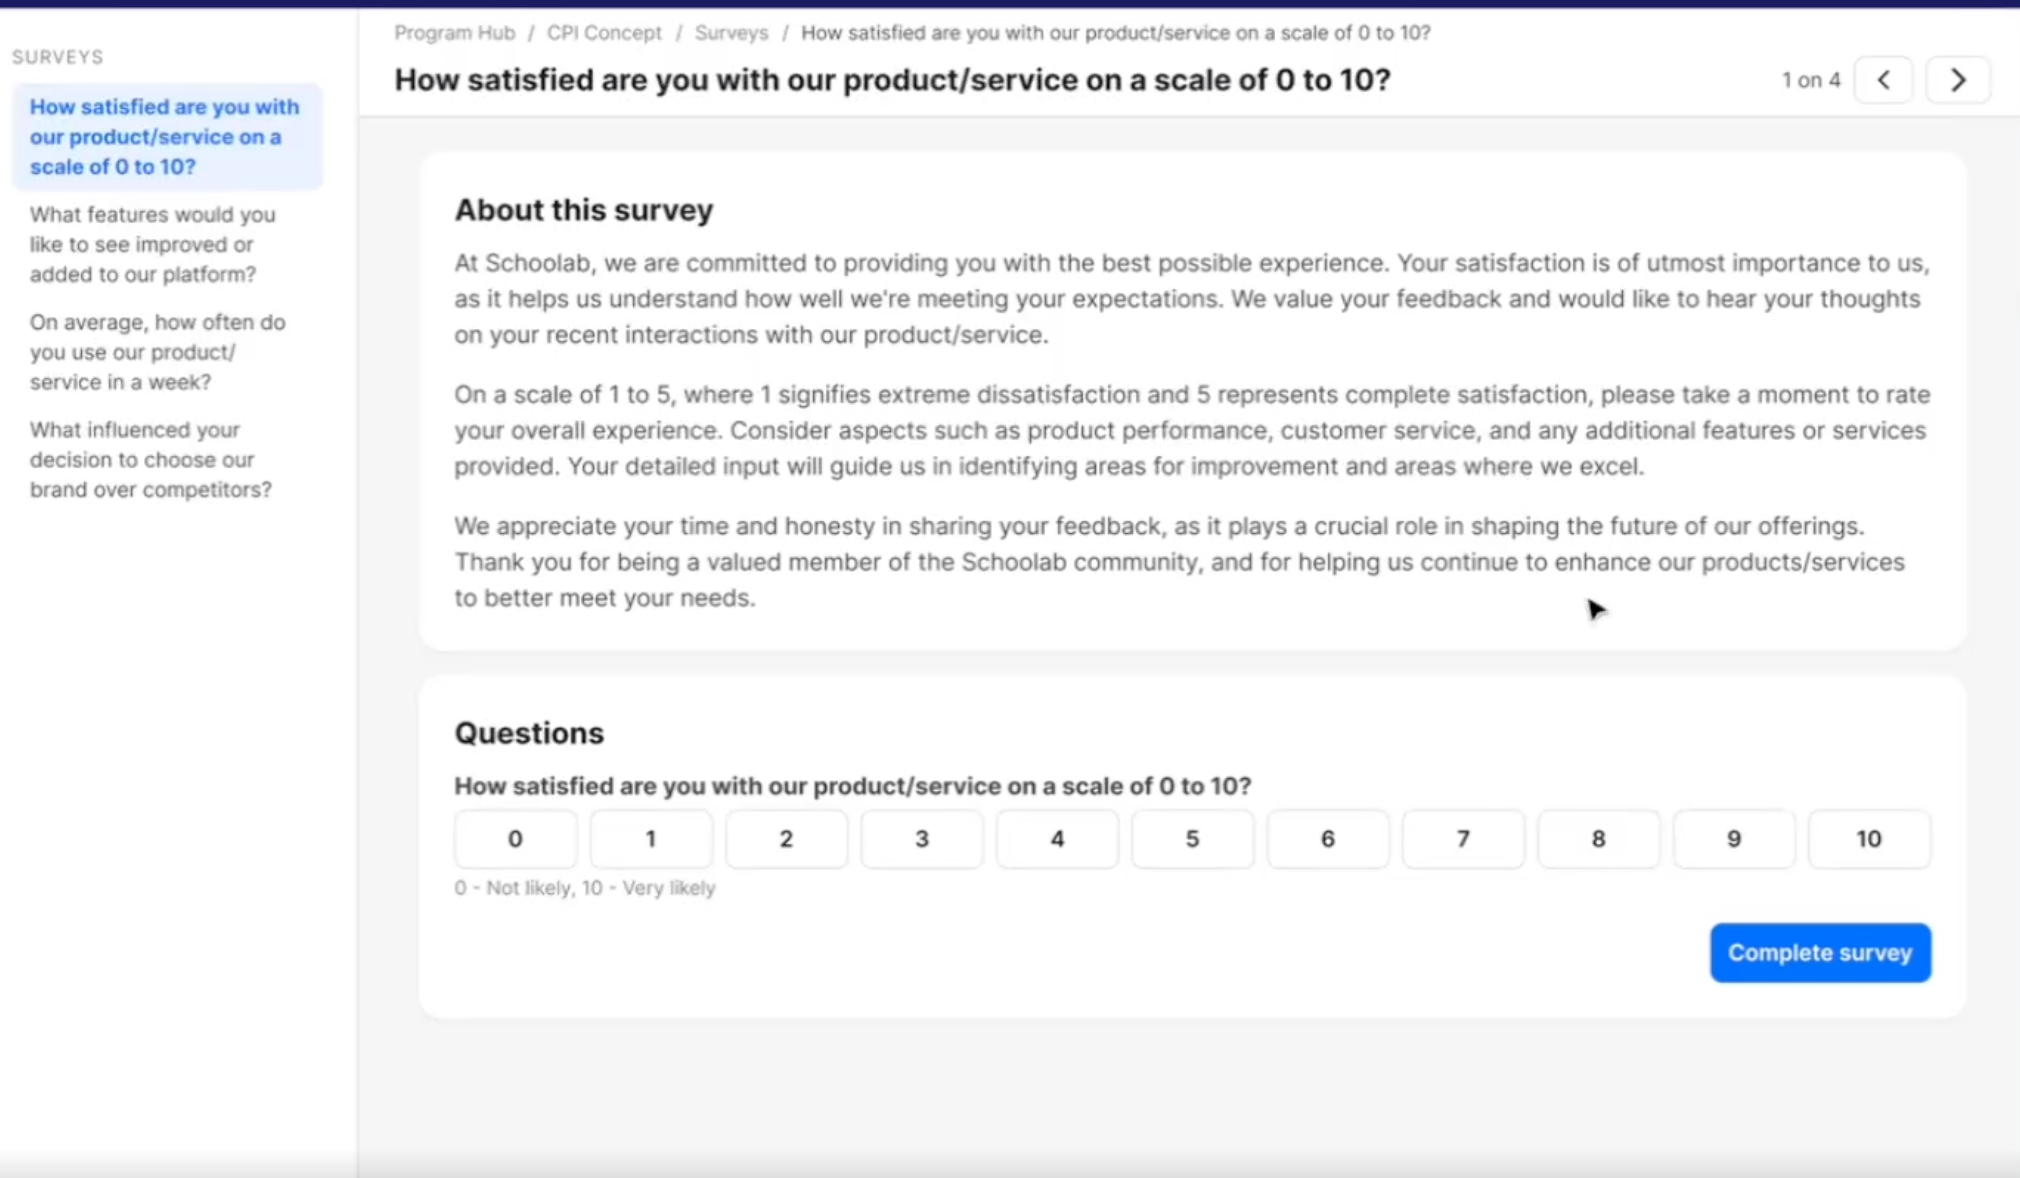
now you can segment users to target them for specific surveys. For example: in my incubator, if I have startups specialized in the plastic vertical, I can create a plastic segment to create a survey aimed at them.
To create your segment and survey, nothing could be simpler: go to the "survey" tab, then click on "create a new survey".
👉 We are currently in the process of completing this feature, and the help center article will be published at the end of next week.
But here is a preview :
-
4/ Export your data with a single click
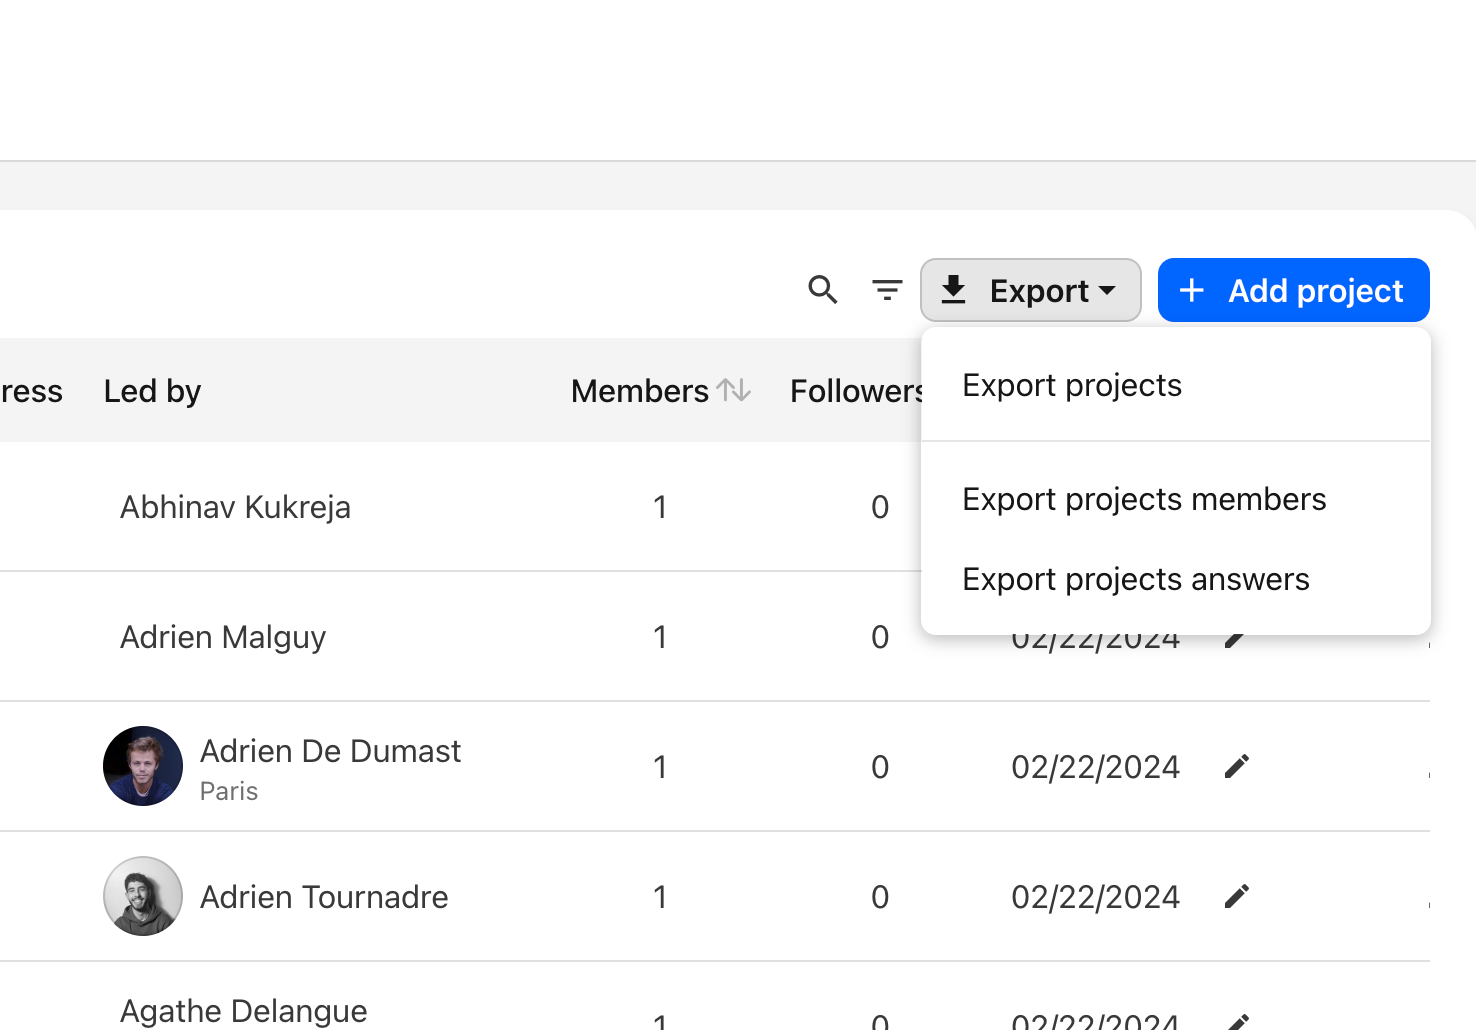
We've made it possible to export all data from the platform.
For example, if I want to export all my registration data, all I have to do is go to the registration tab, choose project or participant, and click on "export". You will then receive an email with a unique link to download the requested data.
👉 For more information, click here.
-
5/ What's on my dashboard?
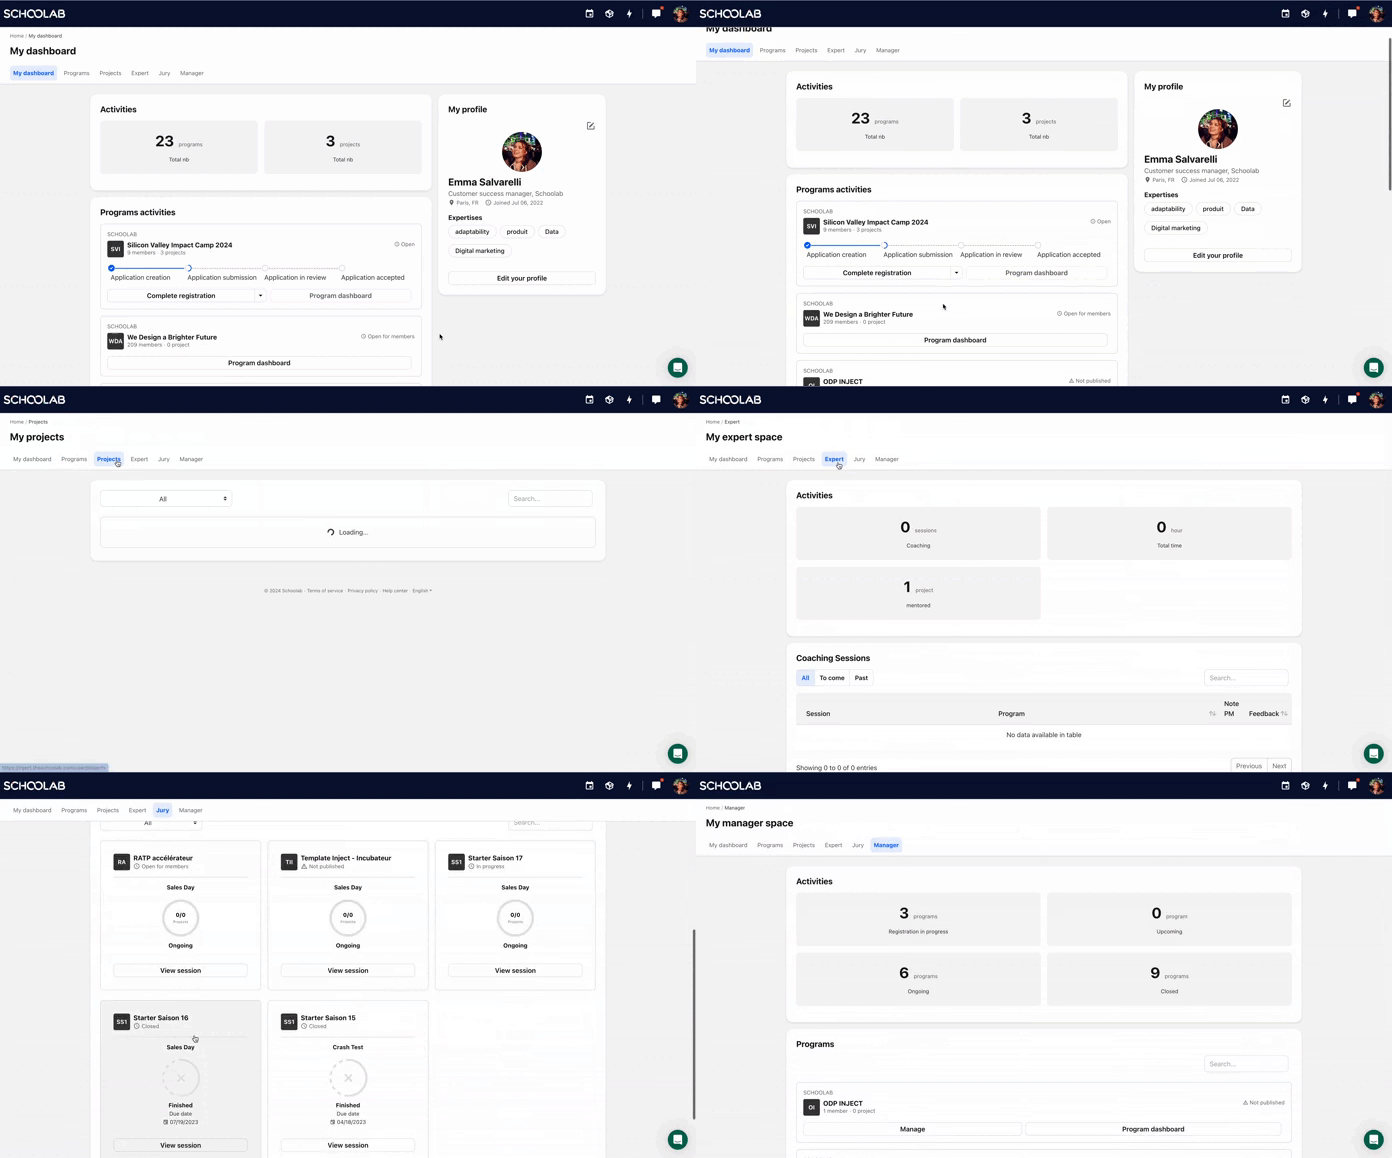
When a participant, expert or PM wishes to find information on the programs in which they are involved, they simply go to their profile and click on "my dashboard".
We've reworked the structure of the user's personal dashboard, a dashboard that allows them to track their participation/role in the various programs associated with their profile, but also provides easy access to the various programs.
👉 For more information, click here.
-
6/ Recurring events
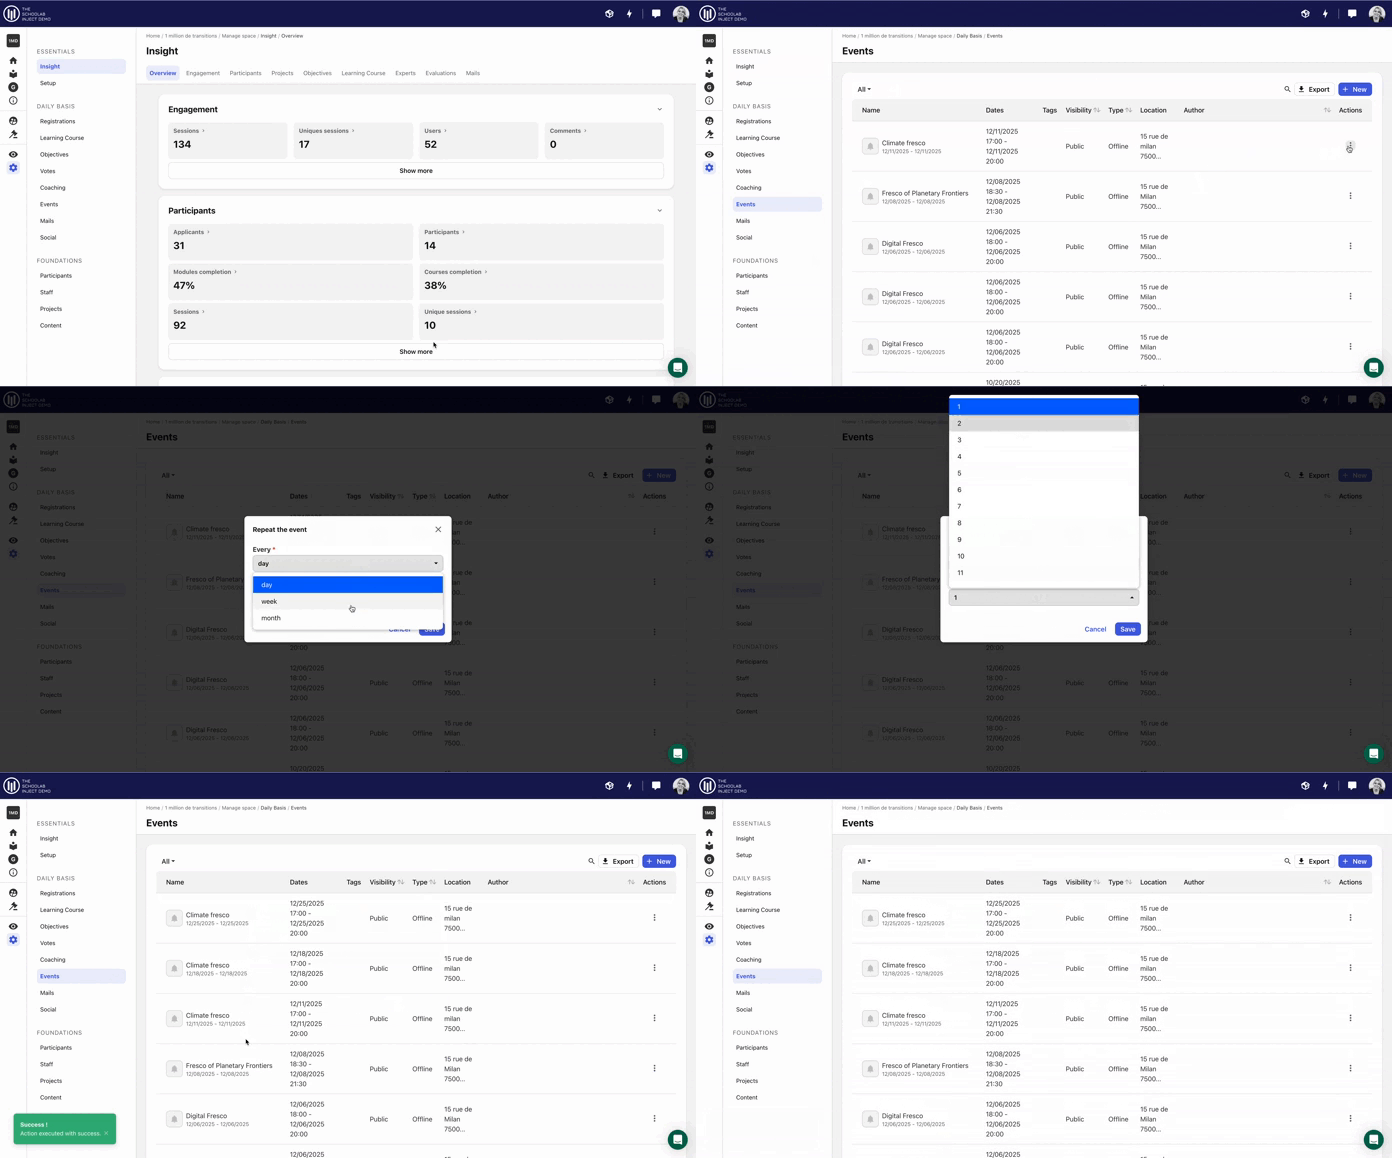
A new feature that will delight many! It's now possible to make an event recurring: daily, weekly or monthly!
To do so, click on the three little dots to the right of your event, then on "Repeat...". Choose your regularity.
👉 For more information, click here.
-
7/ How about automating all this?
To streamline your use of the platform and the implementation of programs, we can now integrate APIs on the platform to automate or connect external tools to INJECT.
For example: when a program is created in the Starter Season 17 program, it can be copied to all incubation programs from slack.
👉 For more information, contact the digital team.
Here are the new features for October, and how to use them:
-
Add participants to events more easily :
We've created a new feature that lets you directly register all participants for an event. It's very easy to do:
👉 Click on "
Manage program
". 👉 Go to "
engagement
" then click on "event
".👉 Once your event has been created, or by selecting the event of your choice, click on "
Attendees
". 👉 On this page, you'll see the "
+
Add
" button, click on it
. The "Add all participant"
option will appear, just click on it and all the attendees in your program will be considered registered for your event. 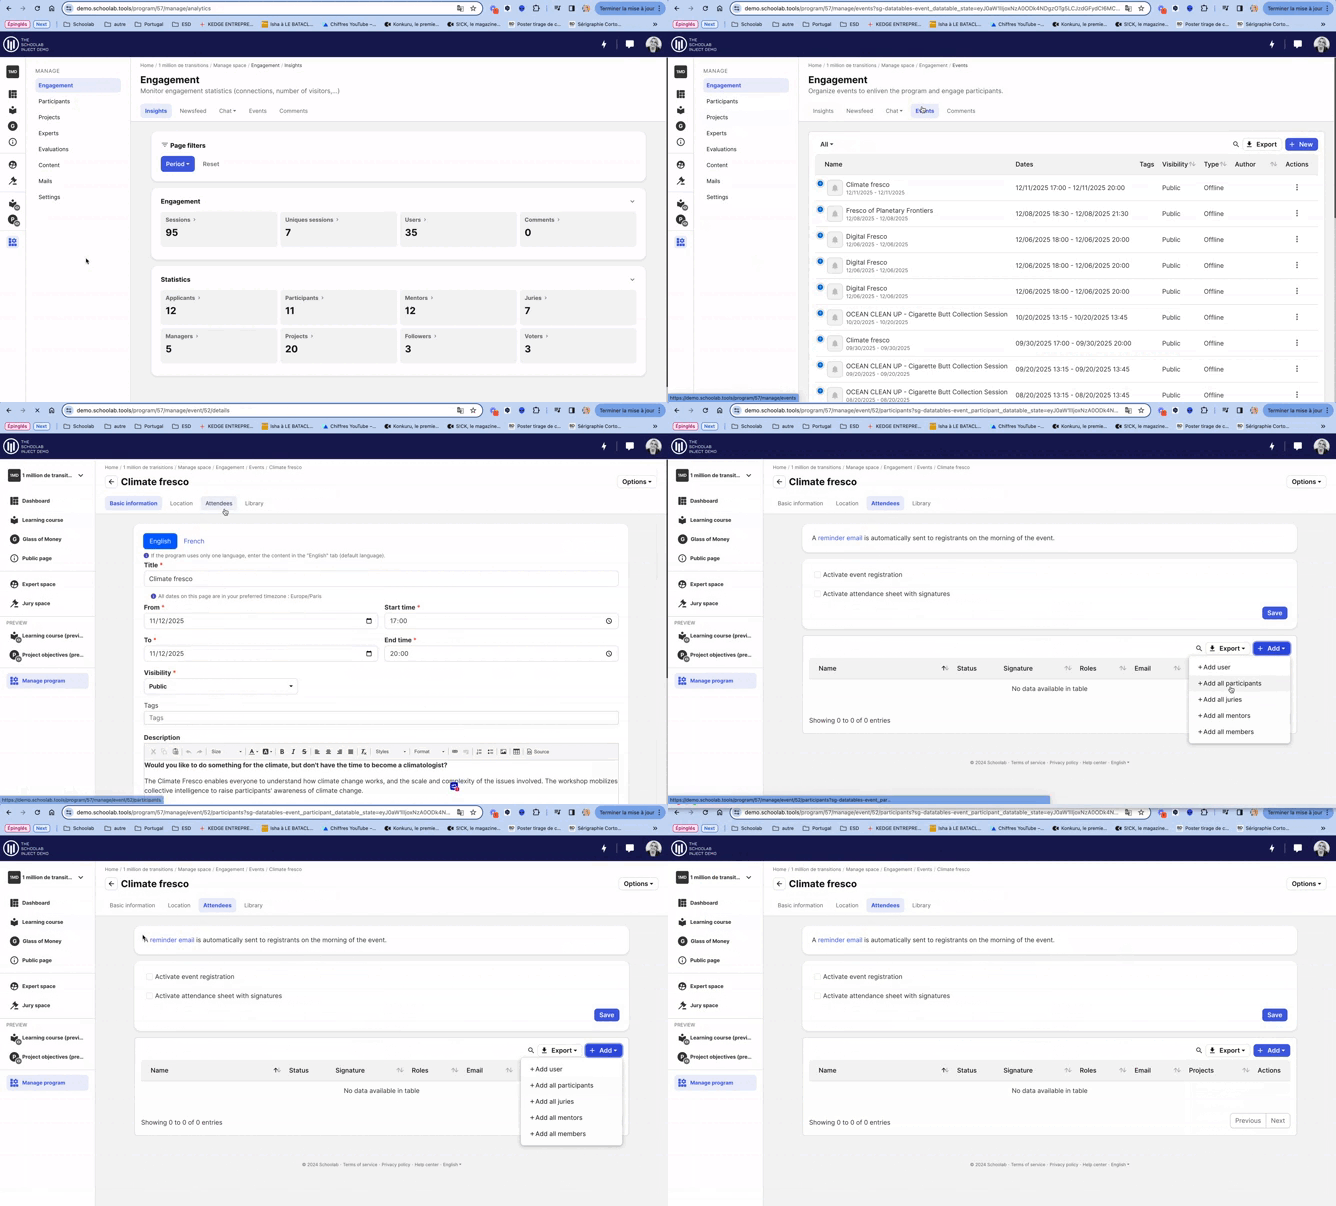
This feature is useful for sending automatic reminders to your events.
-
Add jurors to evaluation sessions more easily
We've created a new feature to make it easier for you to add jurors to assessment sessions.
It's very easy to do:
👉 Click on "
Manage
program
". 👉 Go to "
evaluations
", then click on the "evaluations sessions
" tab.👉 Once you've created your assessment session, or selected the session of your choice, click on "
juries
". 👉 On this page, you'll see the "
+Add
" button, click on it. You'll be presented with several options: "Add a user
", "Add a jury
", "Add all juries
". Today,
you can add a user as a jury
, so if the person has already used the platform, for example, if the person is an expert, you don't have to create a jury profile for them from the list of jurors. What's more,
by clicking on the "Add Jury" button
, if the user is not already registered on the platform, you'll be able to create the account from within the session using the "Create new jury member
" button. 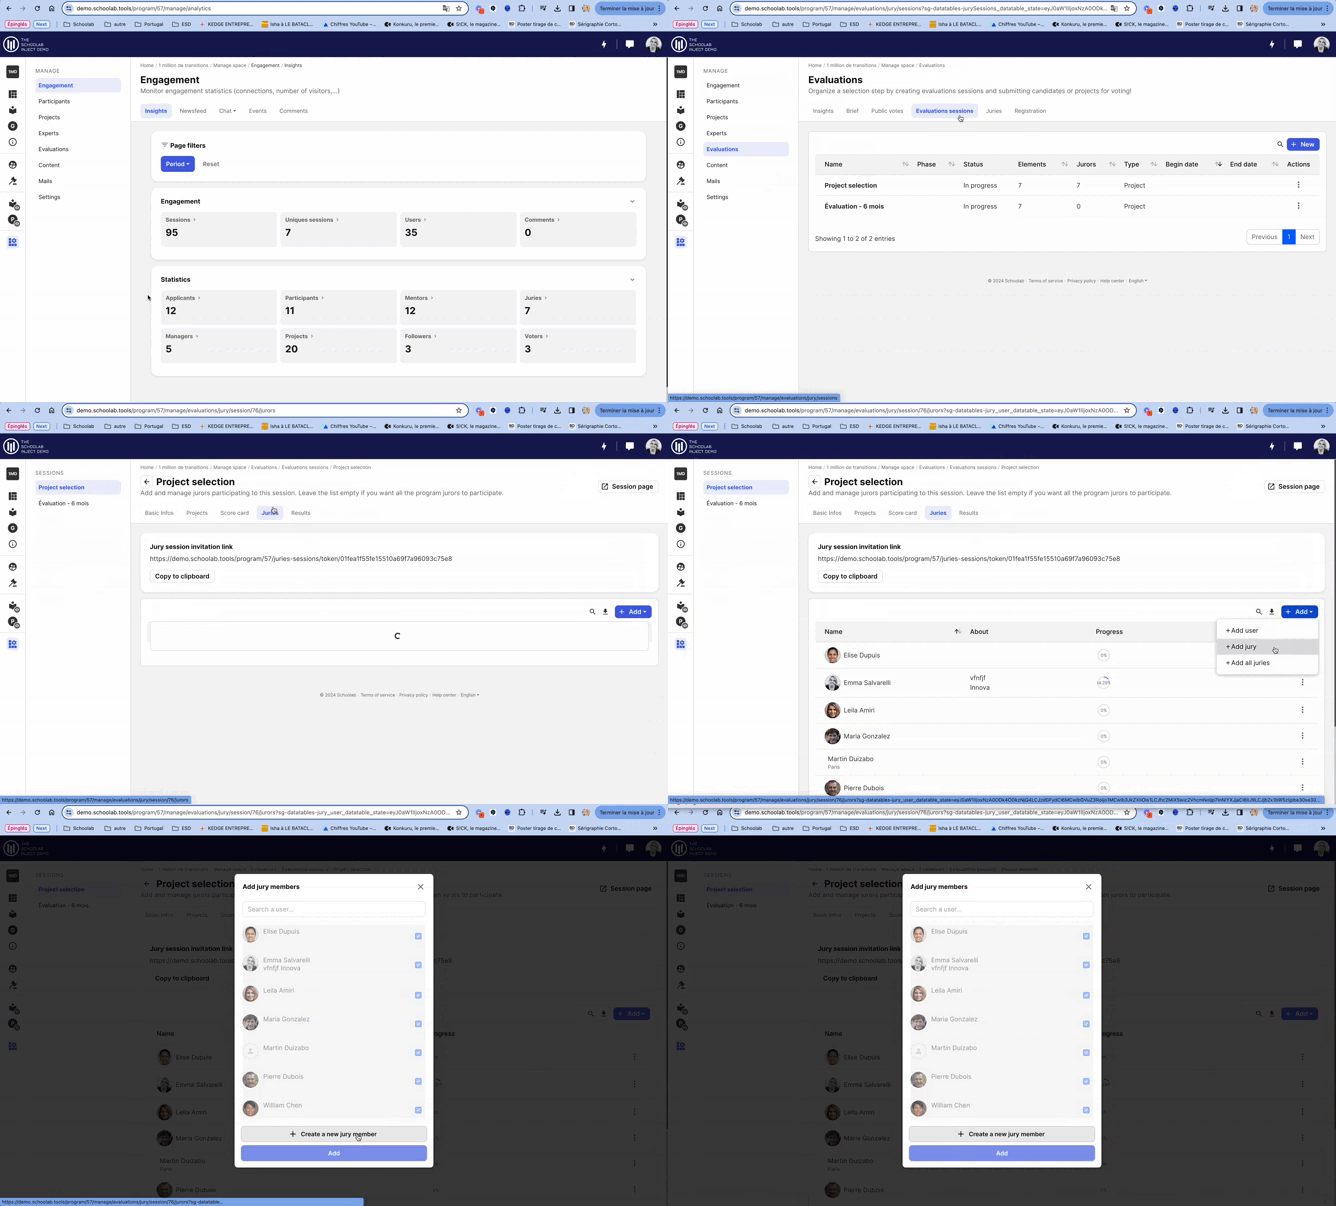
-
New feature: REGEX
If you wish to give access only to a certain domain name for your program registration, you can use the
regex option on the platform
. This is the closest you can get to SSO. Here's how to set up your regex:
👉 Go to the
Admin area
, by clicking on the lightning bolt at the top right (you need to be admin to access it, if not, contact the support team)👉 Click on "
settings
" then on "Registration & access
", you'll find a field to fill in the emails corresponding to the REGEX 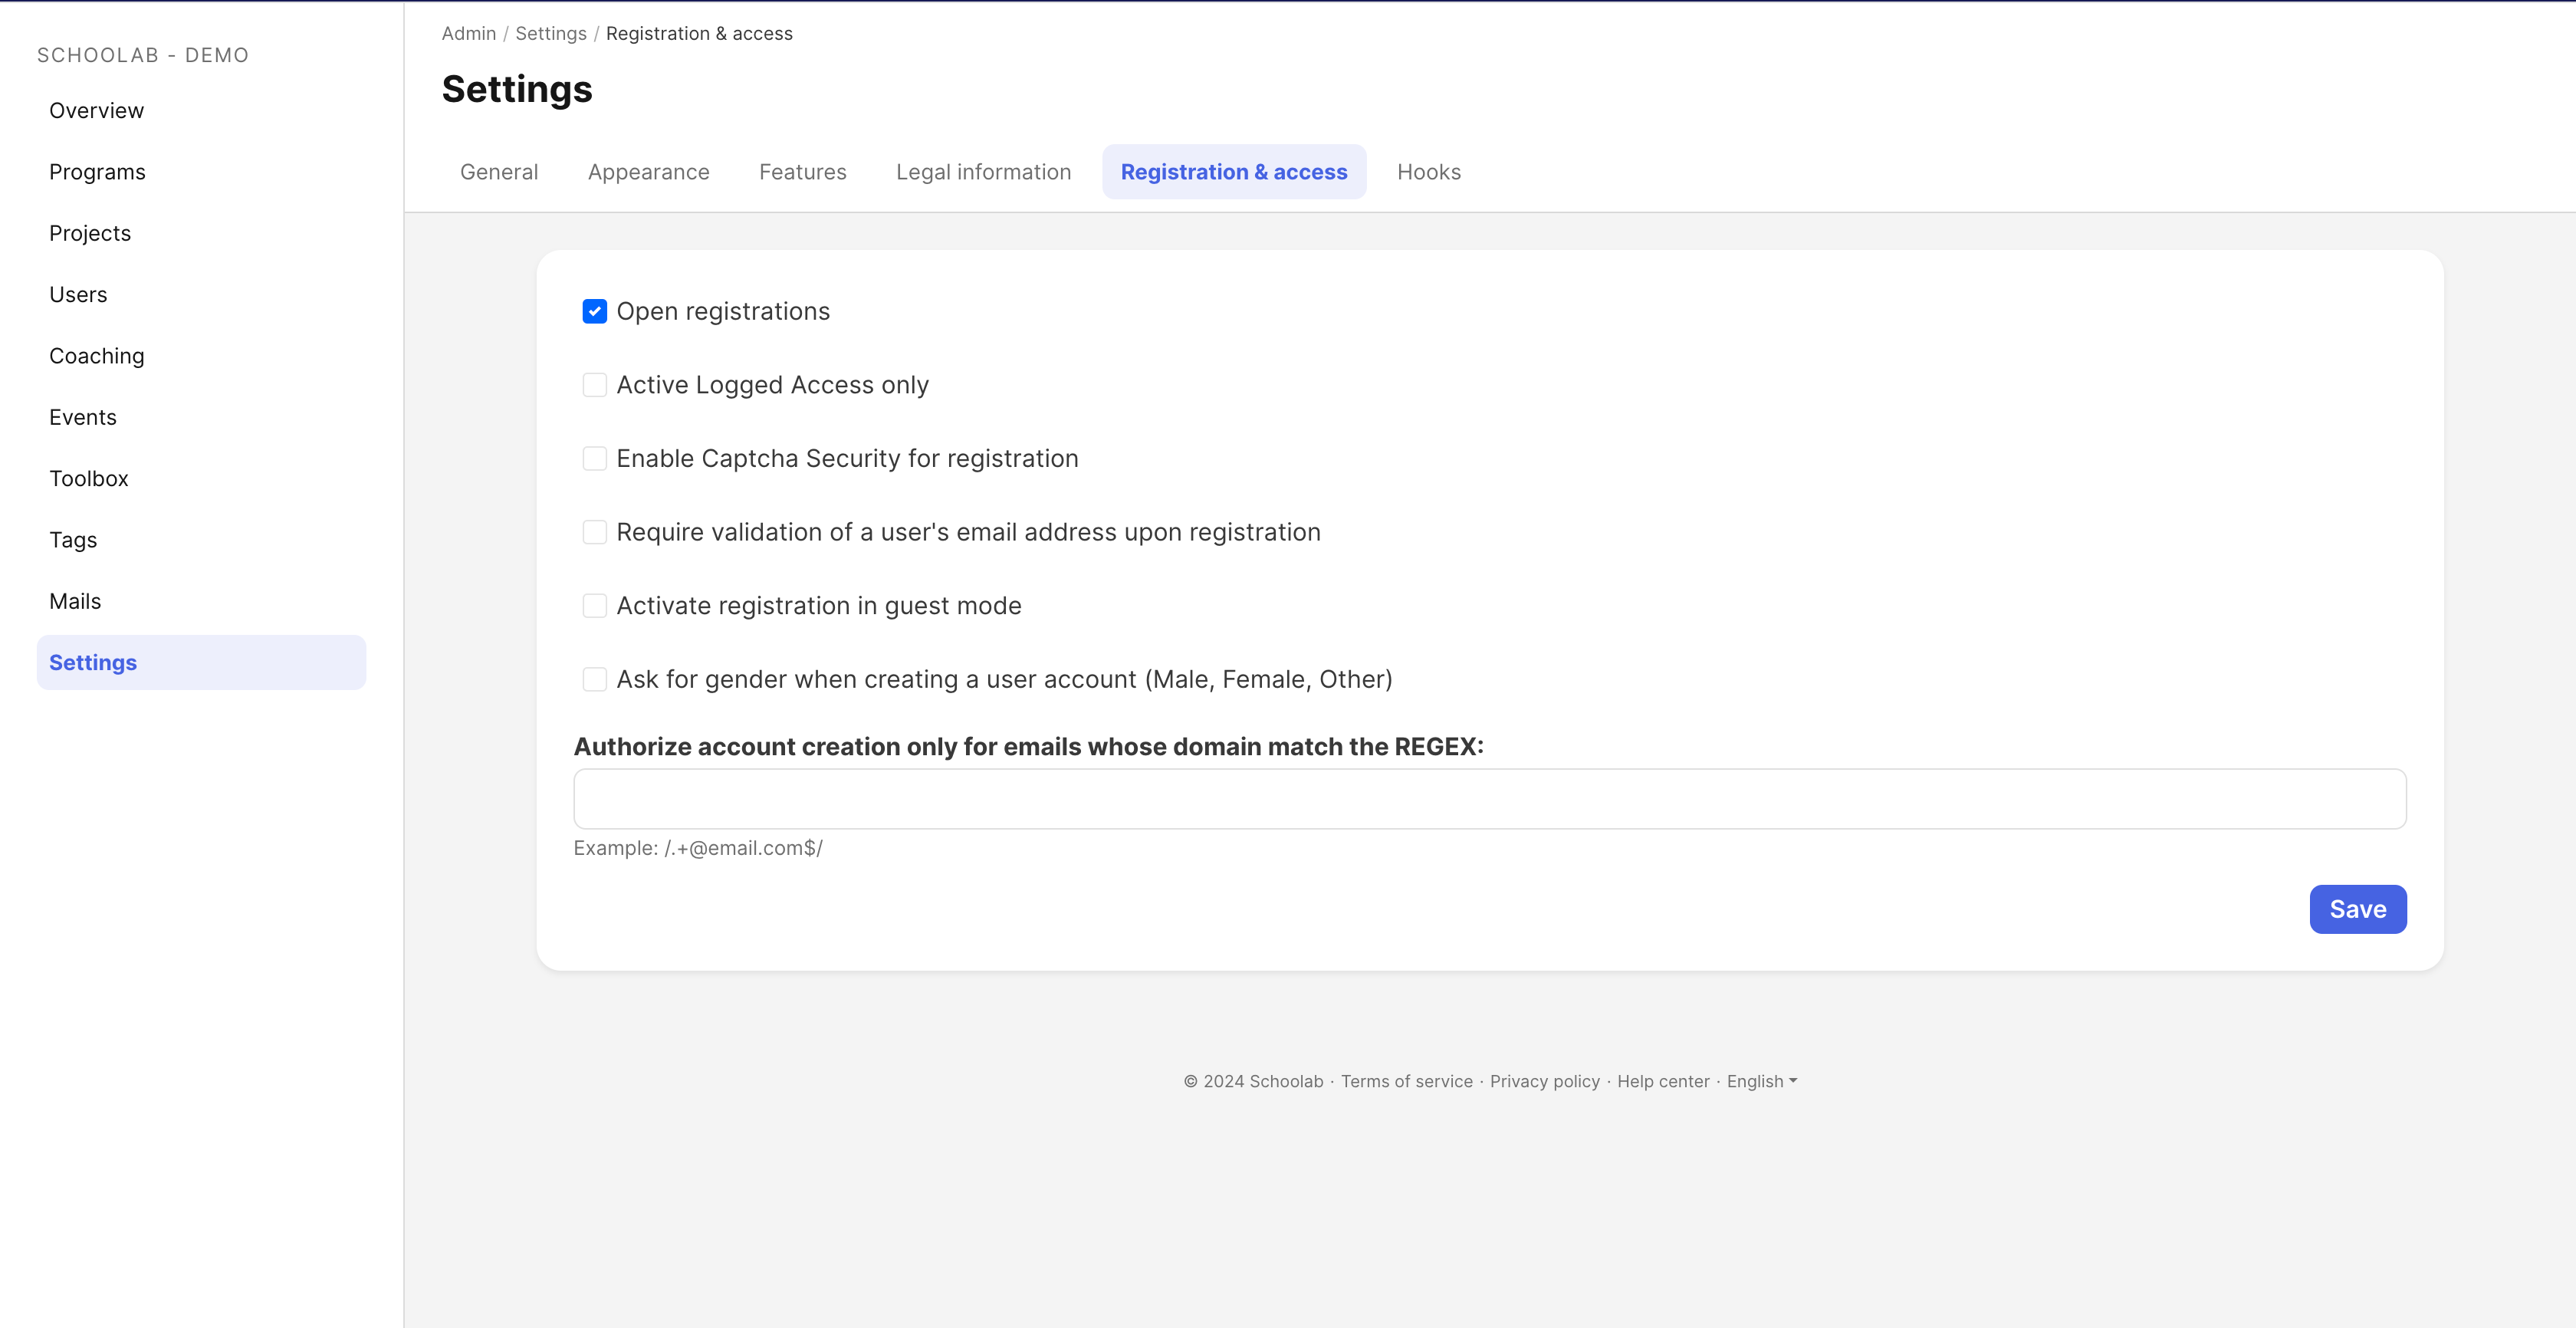
Don't know how to create a REGEX form?
It's very simple:
go to chatgpt
and ask it to "create me a REGEX form for emails with the domain name ... (insert the domain name of authorized e-mail addresses)".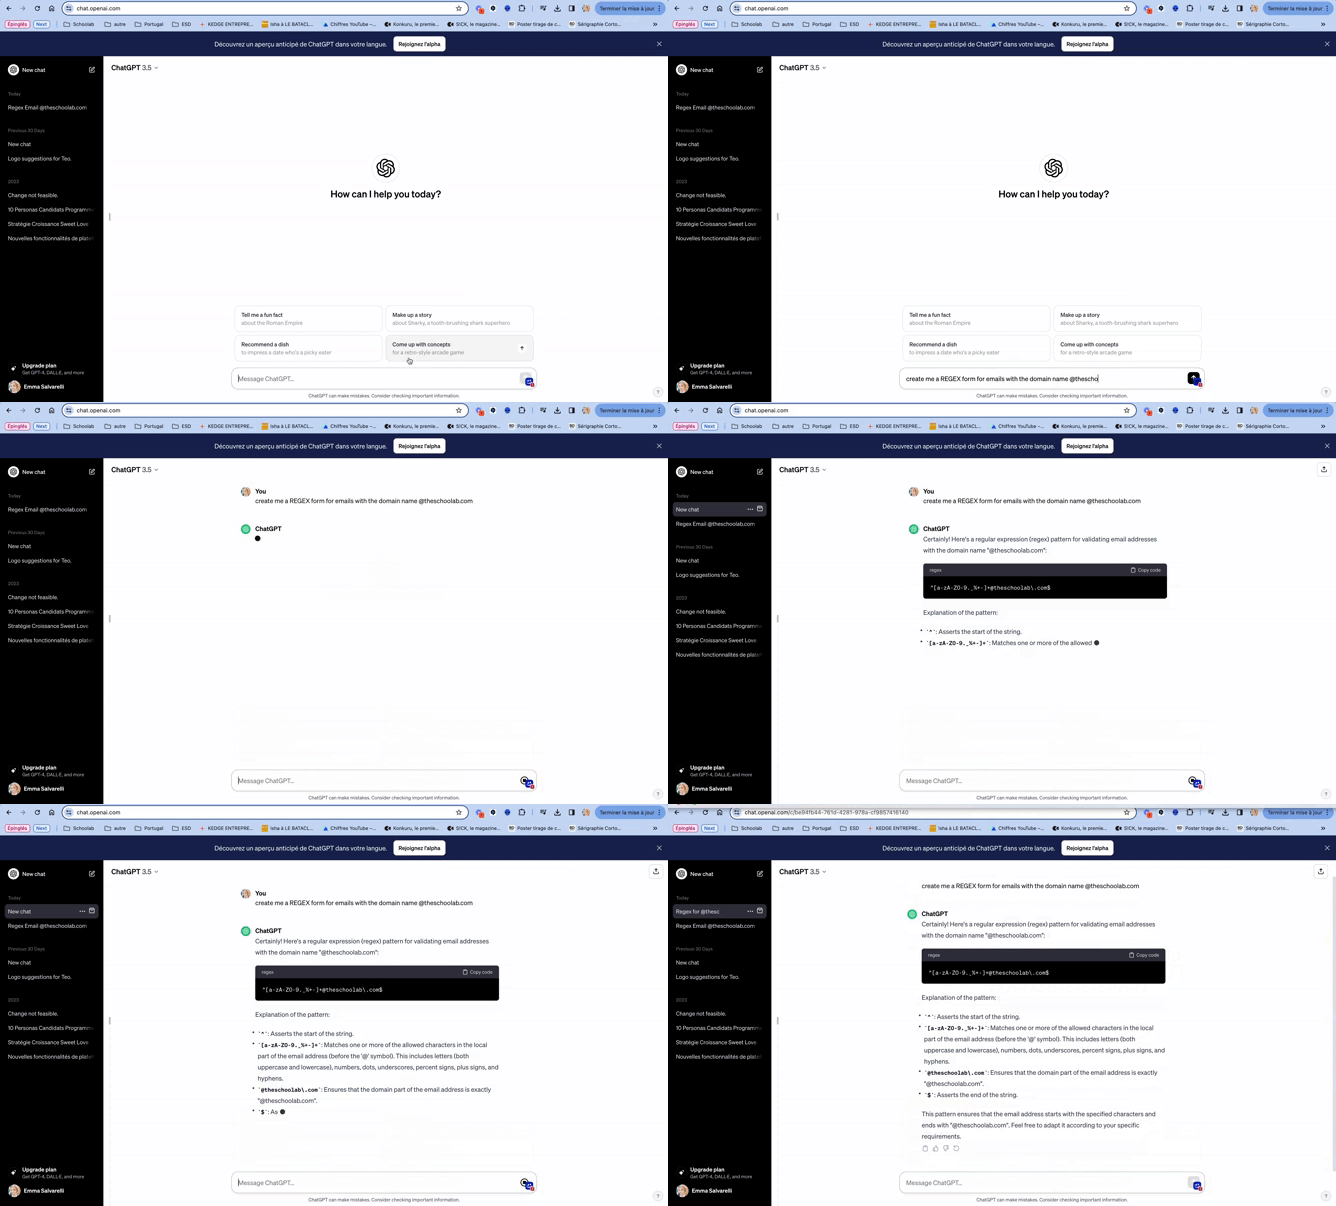
Once you've done this, you can check your formula on this site: https://regex101.com/
If it's validated, you can copy it into the field.
-
Project types
For participant registration questionnaires, there was an option called "participant types", allowing you to create questions specific to a type.
We created the same option for the project form.
You can now filter questions by project type.
It's very easy to do:
👉 Click on "
Manage program
". 👉 Click on "
projects
" then go to the "registrations
" tab, click on "project types
". 👉 You can then add all the project types for which you wish to create specific questions. Simply click on "
Add a type
", and for each type created, a new field will appear at the bottom so that you can create the associated questions.
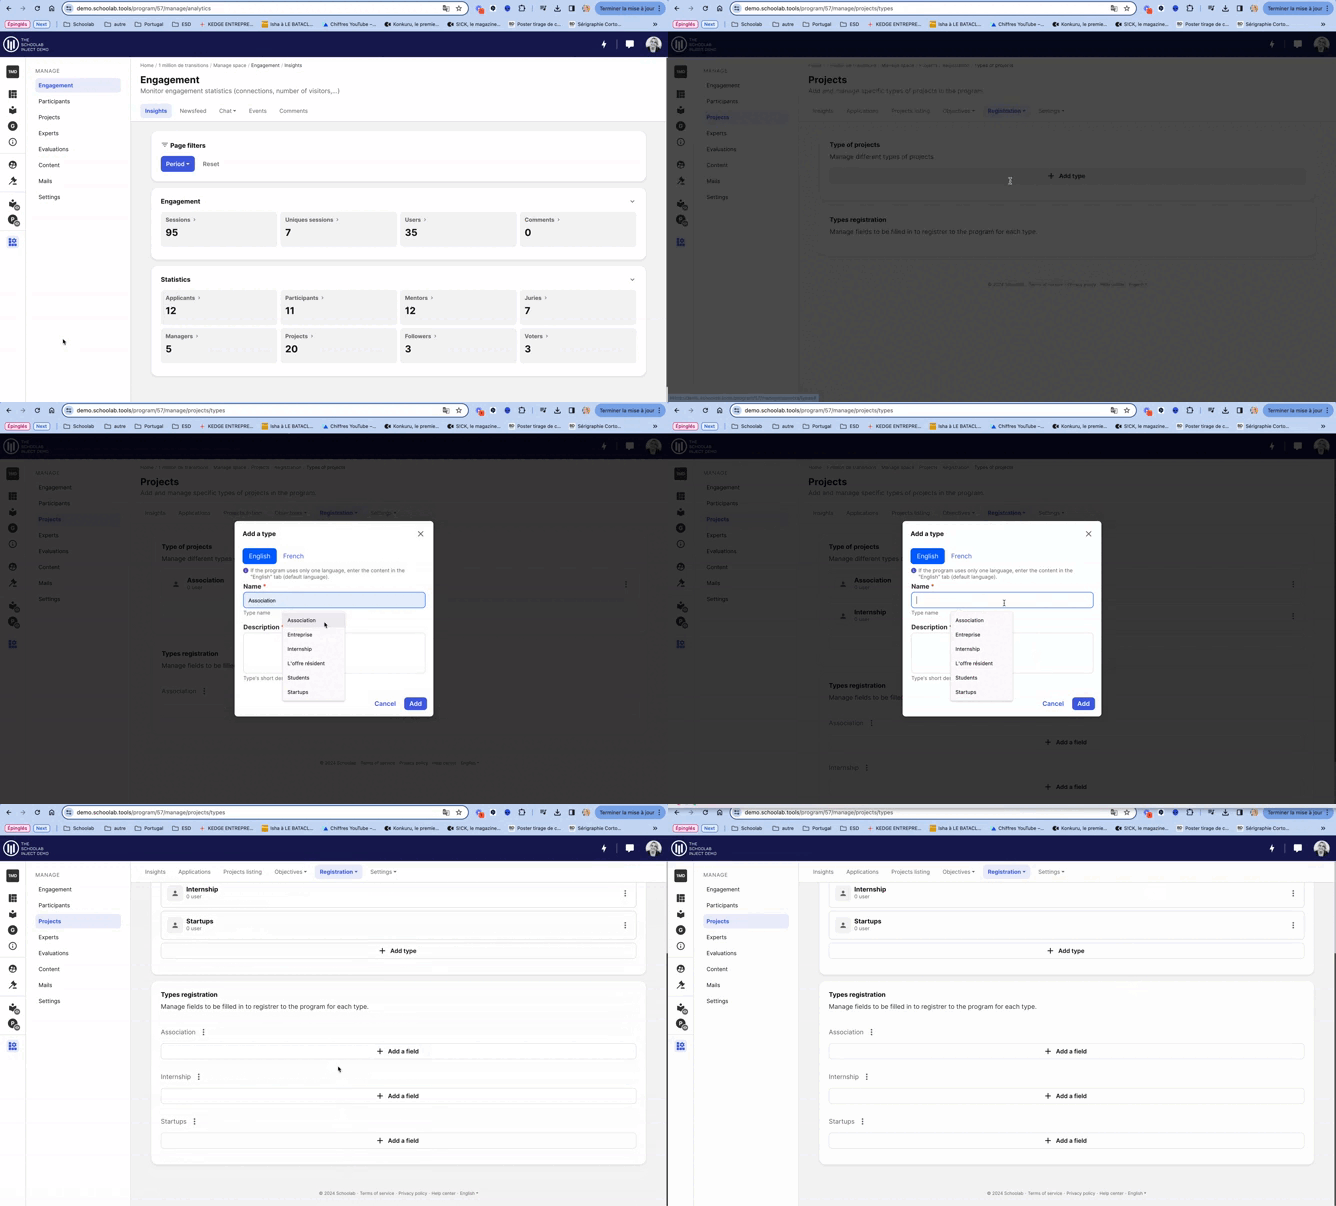
Project owners will be able to choose the type of project at the beginning of the project questionnaire, where they can select their type. This choice can be modified during the questionnaire.
-
Connect to Kahoot!
To bring your community to life, it can be interesting to set up activities on the platform such as interactive quizzes.
That's why we've created a direct link with the
Kahoot platform
, so you can put public rooms on the dashboard newsfeed, and participants can access the quiz directly. Here's how to put a room on inject:
👉 First create your quiz on https://kahoot.com/ , make sure it's public!
👉 Once the quiz has been created, copy the sharing link
👉 On your program, click on "
manage program
" then in the "engagement
" tab, click on "newsfeed
". 👉
Create a new newsfeed post
, put in the message of your choice, then paste your kahoot link in the resources section at the bottom of the post.
🚨 Be sure to check the "primary resource" box.
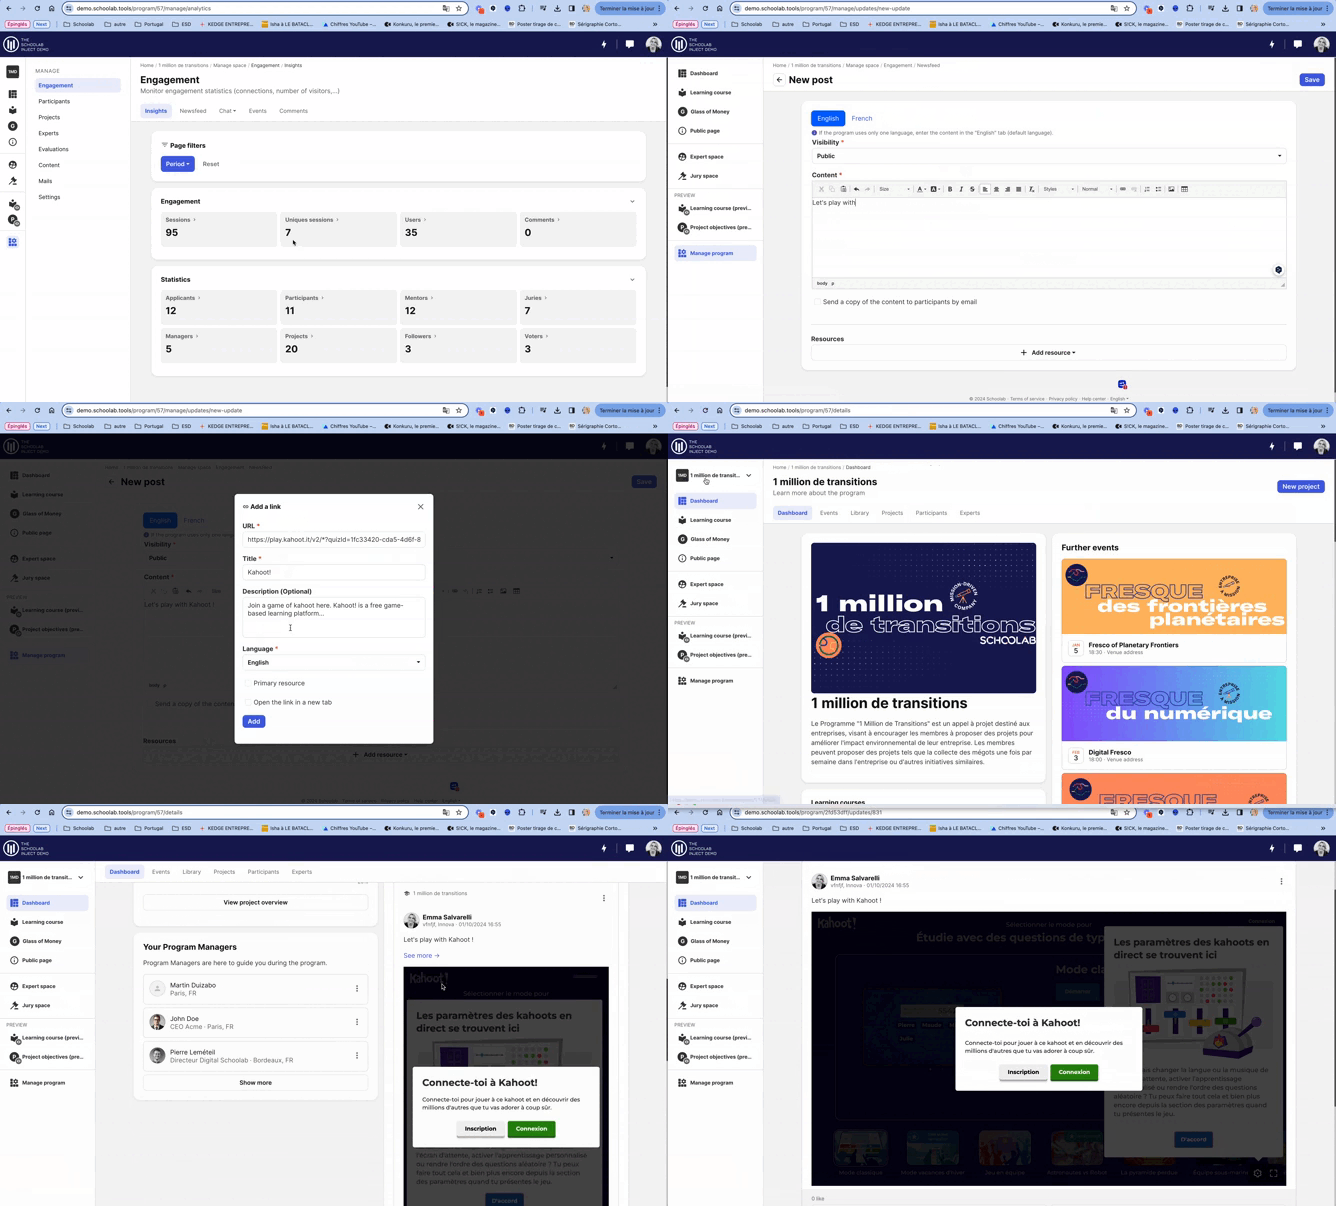
And now your kahoot quiz is available on the newsfeed!
Here are the new features for September, and how to use them:
A New Shortcut Bar
In order to enhance the platform's readability for program managers, we have divided the shortcut bar. Now, you will be able to see the common sections (dashboard, public pages, and other associated tools) in the first part, followed by the preview section (learning courses and objectives), and finally the program management section.
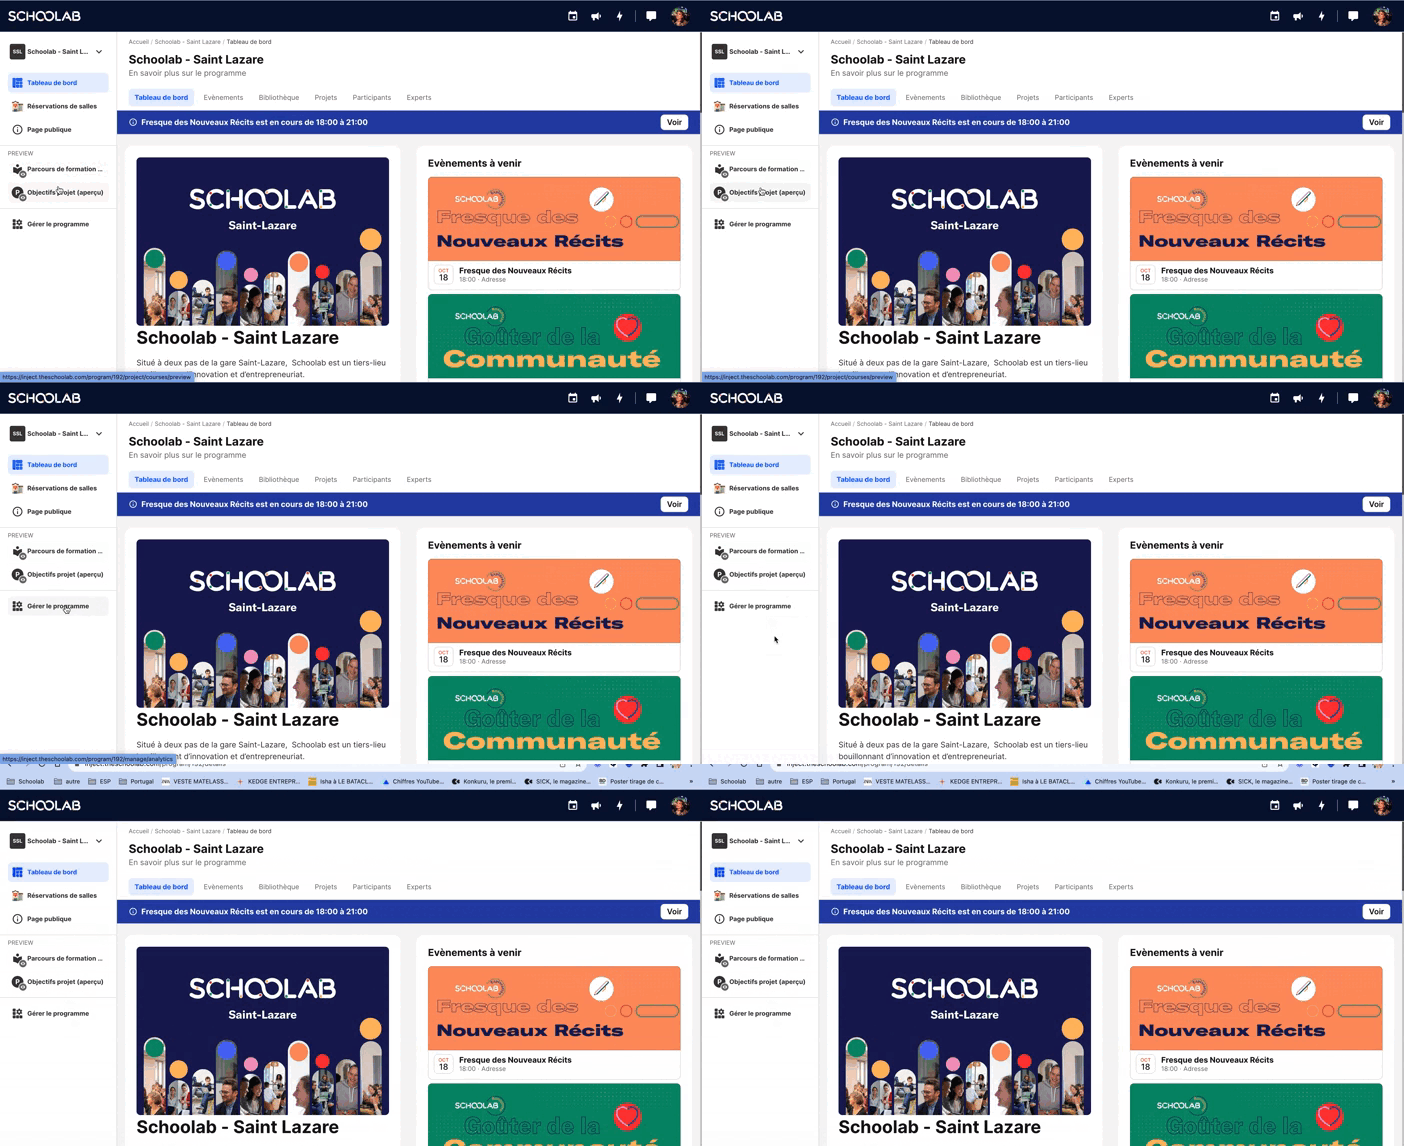
-
A New Presentation of External Programs
While all public programs, both internal and external, are available on the page inject.theschoolab.com, external programs are hosted on other sites. To simplify redirection to external programs, now when you click on your preferred external program, a pop-up will appear and offer to open the program's website.

-
Copying a Project/Participant from One Program to Another
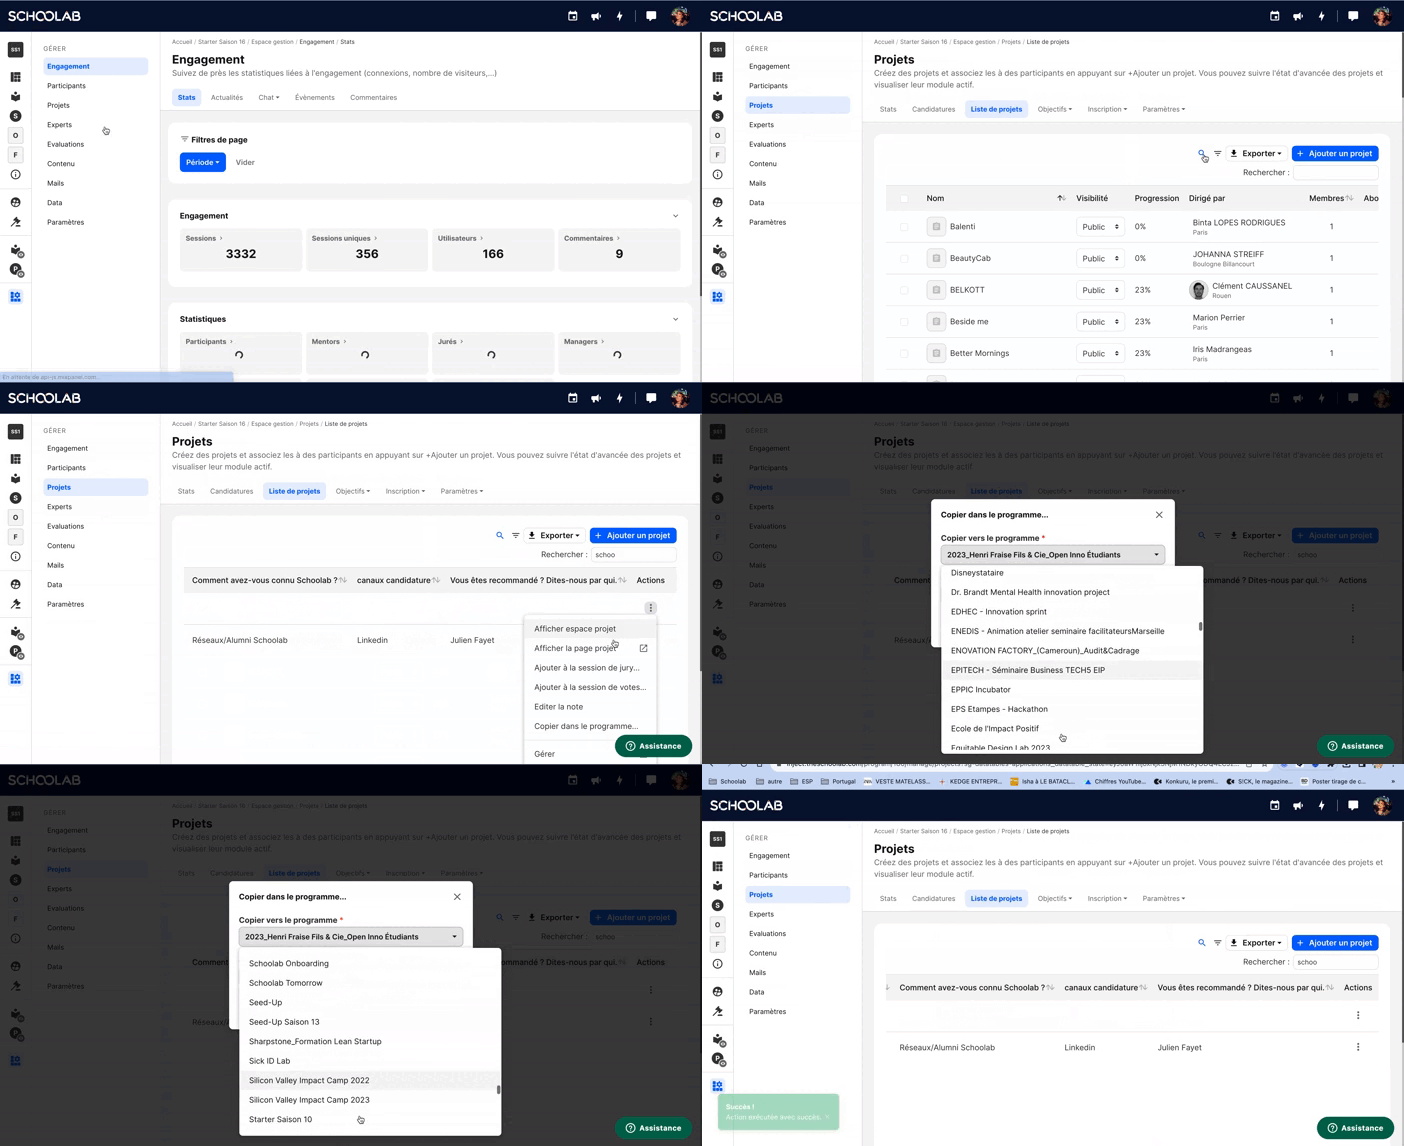
For incubators, it's common for participants or projects to continue from one season to another. To simplify the transfer, we have added the "copy to program..." option. Here's how to do it:
👉 Go to "Manage program."
👉 Click on projects or participants, then on the list of participants/projects.
👉 On the far right, click on the three dots under "action," and select "copy to program..."
👉 Then, select the program into which you want to copy the participant/project.
🚨 When you copy a project, all its participants are automatically copied as well.
Here are the new features for August, and how to use them:
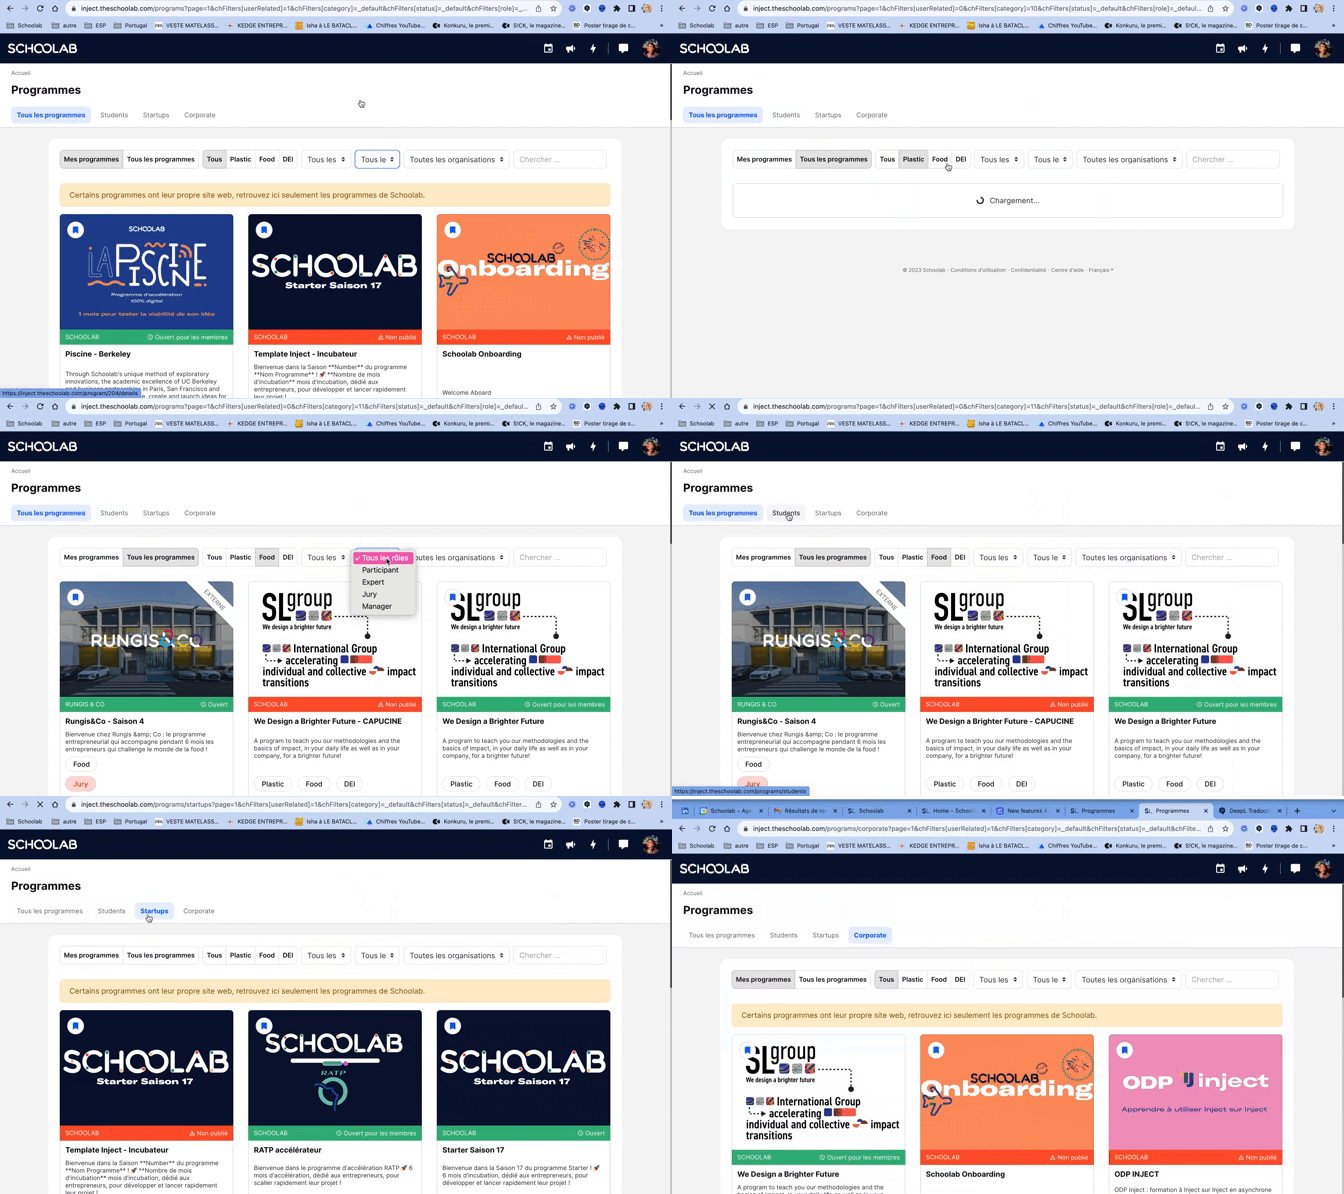
To make life easier for platform users, we've created a single link to register: inject.theschoolab.com.
On this interface, you'll find all the programs that use the Inject platform. You can sort them by field: students, startups and corporate.
By vertical: DEI, Food and Plastic.
By role: participants, experts, juries and program managers. Your roles will appear with thumbnails on the program card.
You can also find your programs directly in the "my programs" tab.
A single link to find everything.
-
Creating a template for your landing page
To enable you to create your own landing page, we've created customizable templates (text and photo; to change colors, please contact support).
Here's how to do it:
👉 Go to
manage program
👉 Click on "
content
" then on "public tab
". 👉 Some tabs are already
pre-created
, so you can either use them or create a new one. 👉 If you choose an existing one,
click on it
, otherwise click on "Add tab".
👉 Click on the box to start editing, then on
"grid"
. 👉 A menu will appear on the left, click on
Template
👉 Go to category and choose
"styles"
, select "Schoolab"
. 👉 Next, you can add blocks by clicking on the + on the main screen, you can add a
"hero"
which represents the top of the page, "content"
which will be used to add content information, but also a footer which will close the page. 👉
To modify the text
, click on the block and then on the part of the text to be modified, write what you want. 👉
To modify a photo
, click once on the photo to be modified, then click on the image bookmark, then upload it. Don't forget to set the right dimensions! 🚨 Always save your changes
Here are the new features for July, and how to use them:
The "preview" function
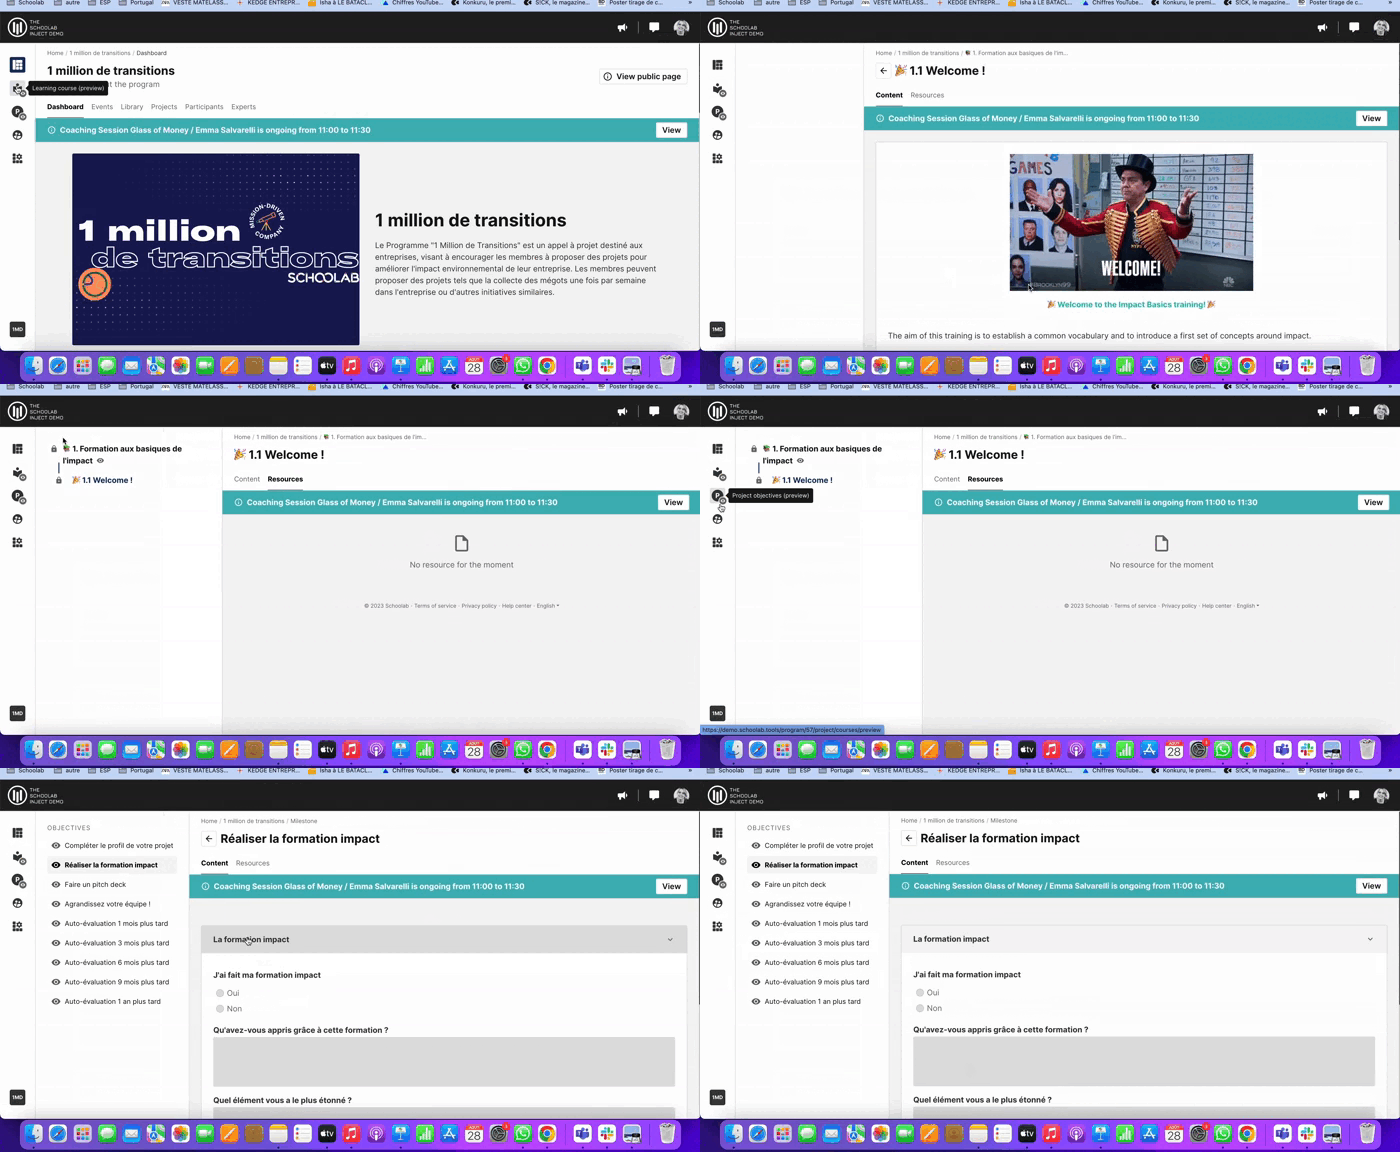
To avoid PMs having to create a participant account and have a project to view the training path, we have created a default "preview" area for program managers.
To access it, simply create a training path or objectives. Then you can access the preview area in the left-hand navigation bar, using the bookmarks with a little eye.
Now you can view the entire program.
Here are the new features for June, and how to use them:
1. A new jury interface
To see the new jury interface, here's a Help Center article: https://support.theschoolab.com/hc/en-us/articles/14795591622929--The-jury-s-point-of-view
2. An inventory of all coaching sessions, across all programs.
So that an admin can easily find all coaching sessions, whatever the program, we have created a "coaching" space in the admin interface.
To access this area, simply click on the light at the top right of the screen. Once in the admin area, click on the "coaching" tab. You'll find a list of all coaching sessions for all programs.

Here are the new features for May, and how to use them:
1. Easily switch from one profile/project/event to another
-
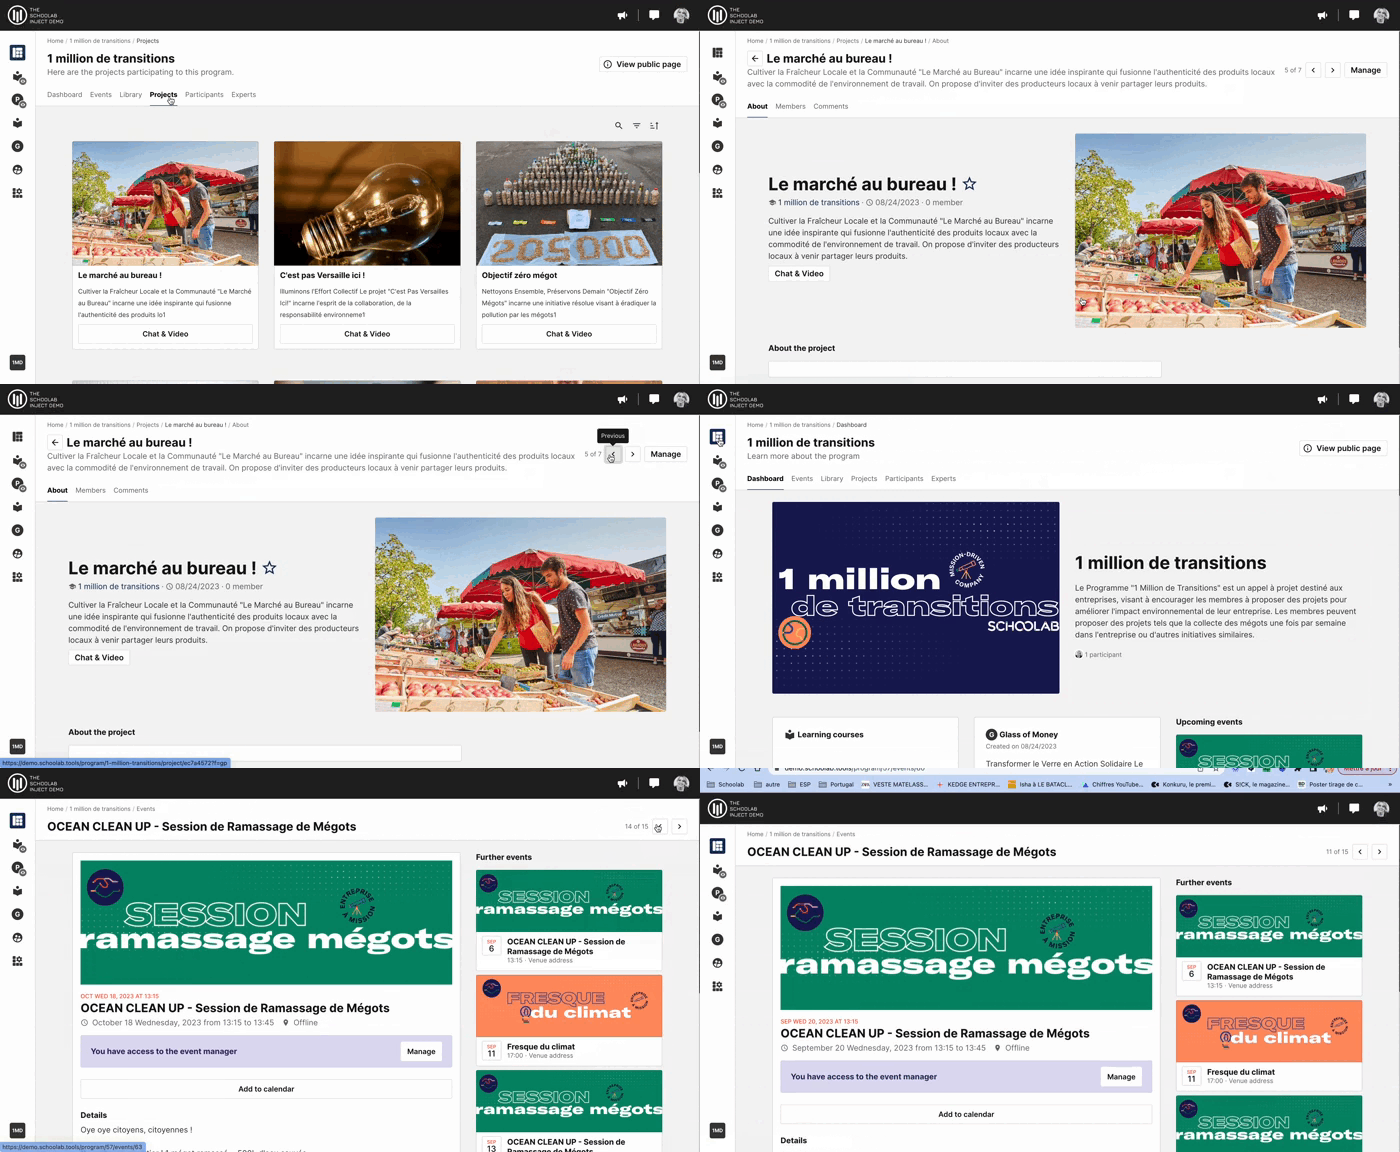
To simplify user navigation, we've added arrows between each profile/project/event to keep users on the same page.
For example: if I click on a project, and then click on "show more details". At the top right of the page, I'd see arrows allowing me to move from one project to another. It will be exactly the same for profiles and events.
-
2. New presentation of events
-
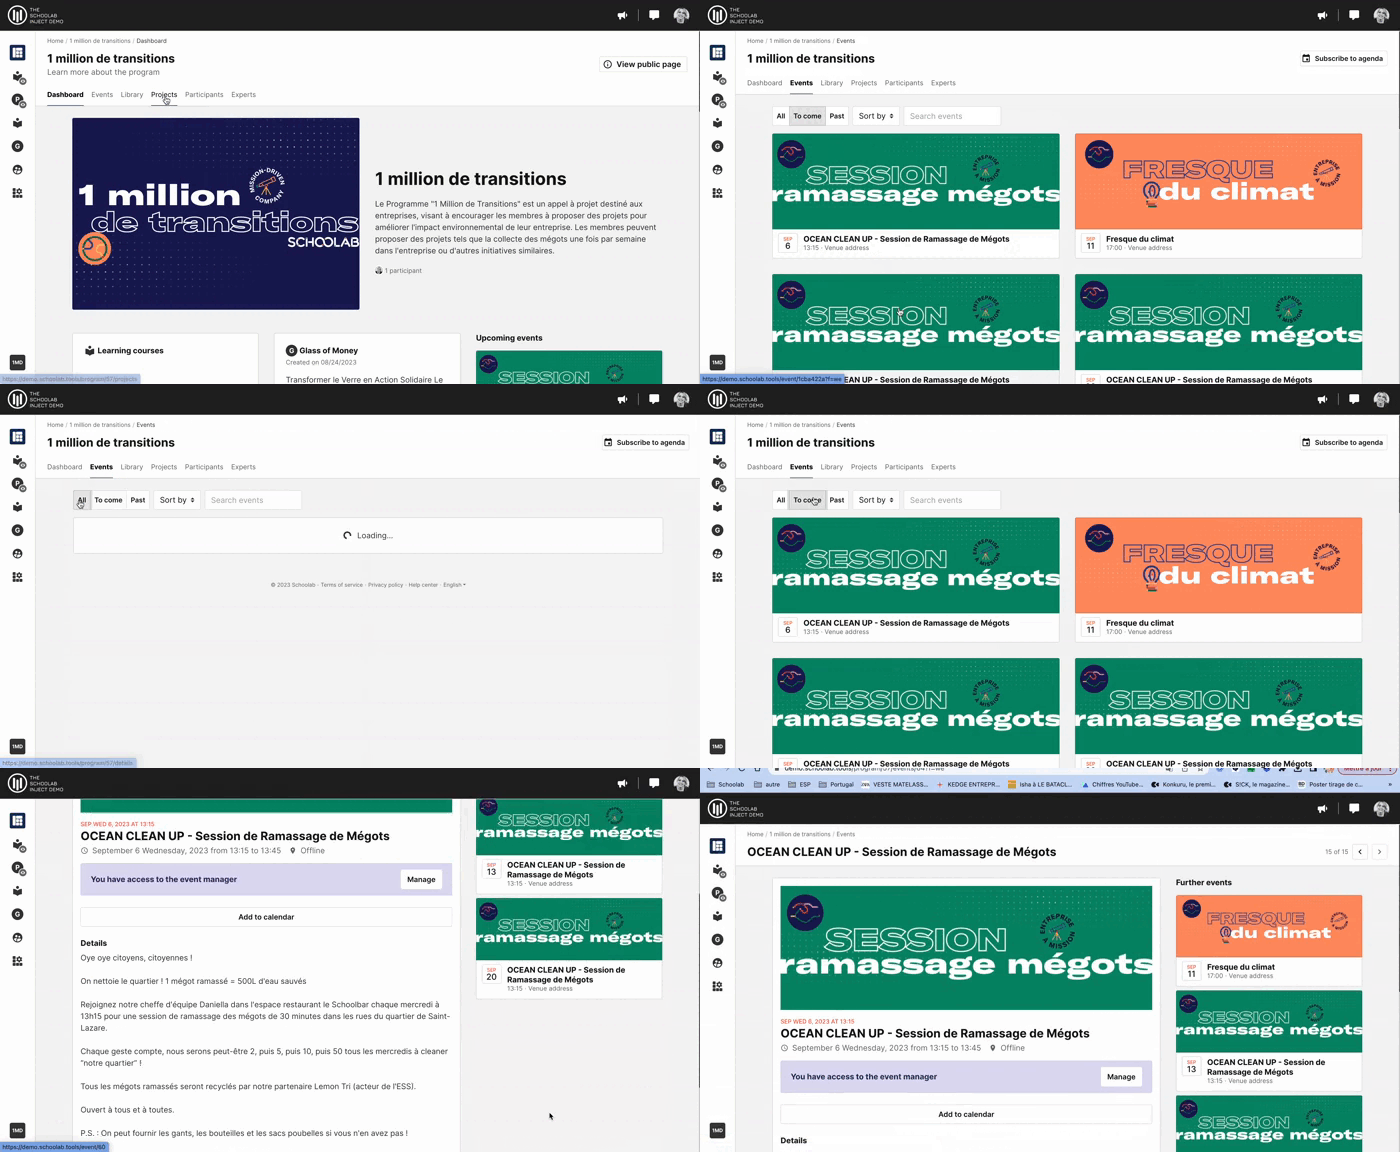
Now, by default, only upcoming events are shown in the dashboard's "events" tab. What's more, we now present them in rows of two. To see past events, simply click on the "past" button at the top. When you click on an event for more details, to the right you'll see a summary of other upcoming events.
-
3. The coaching agenda
-
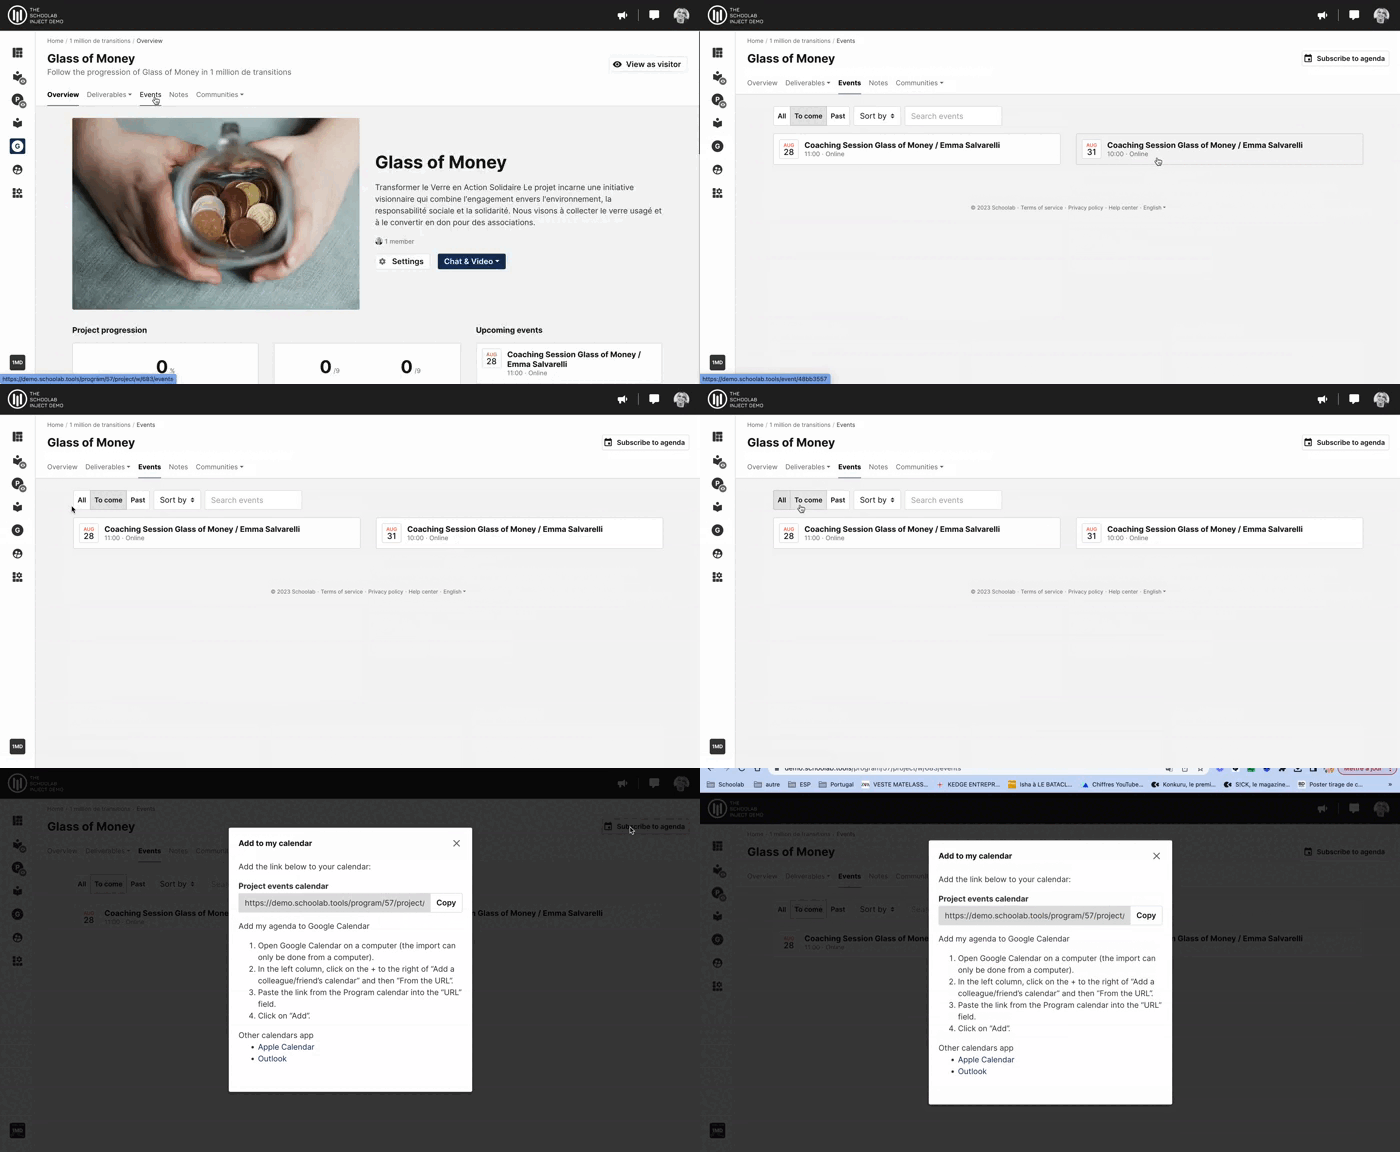
To make it easier to set up coaching sessions, we've added an "agenda" to the project areas. The tab is called "events" and lists all upcoming coaching sessions, as well as past ones. The space is presented in the same way as the "event" tab. Participants can subscribe to the agenda so that their appointment with their coach is added directly to their personal calendar.
Here are the new features for April, and how to use them:
1.Make an appointment with your coach
Now it is possible to make an appointment directly with your expert on the platform. To do so, here is how to do it:
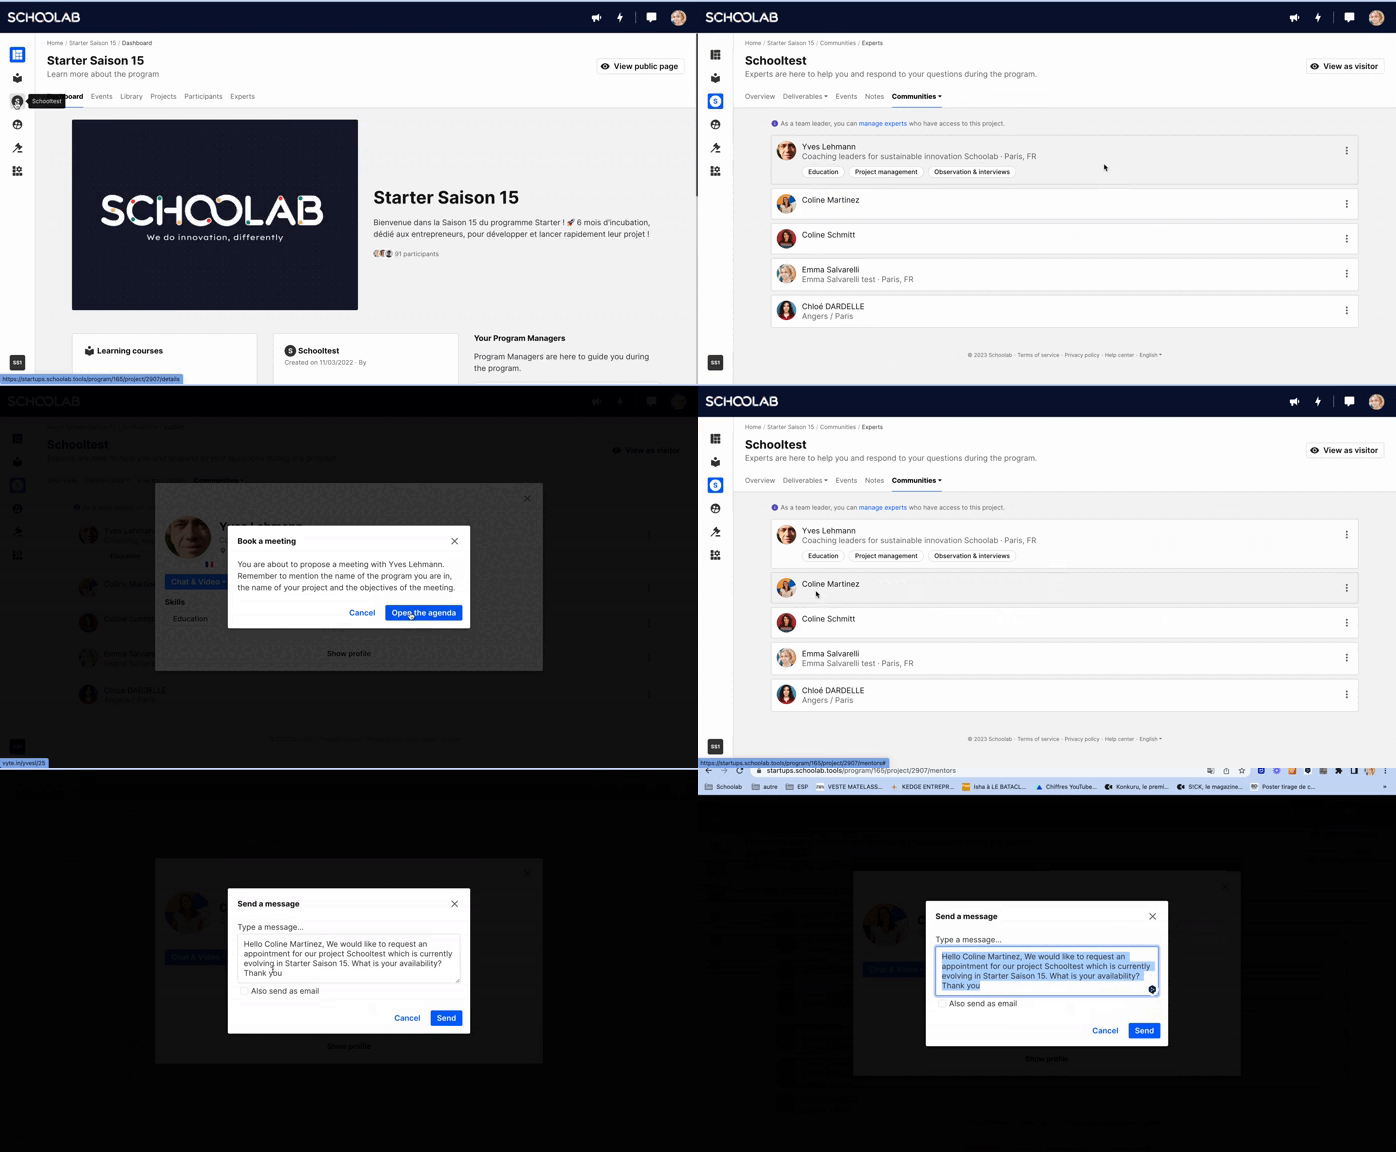
👉 Go to the project space, click on the experts next to the cover photo, or in the tab "Communities"
👉 Click on the profile of the expert you want to make an appointment with, if you have several.
👉 Click on the "book a meeting" button, two options are possible: either the expert has made his calendar available and in this case you are redirected to the calendar, or the expert has not made it available, and a message is automatically created to make an appointment with the expert via the chat.
--
How can experts add their agenda?
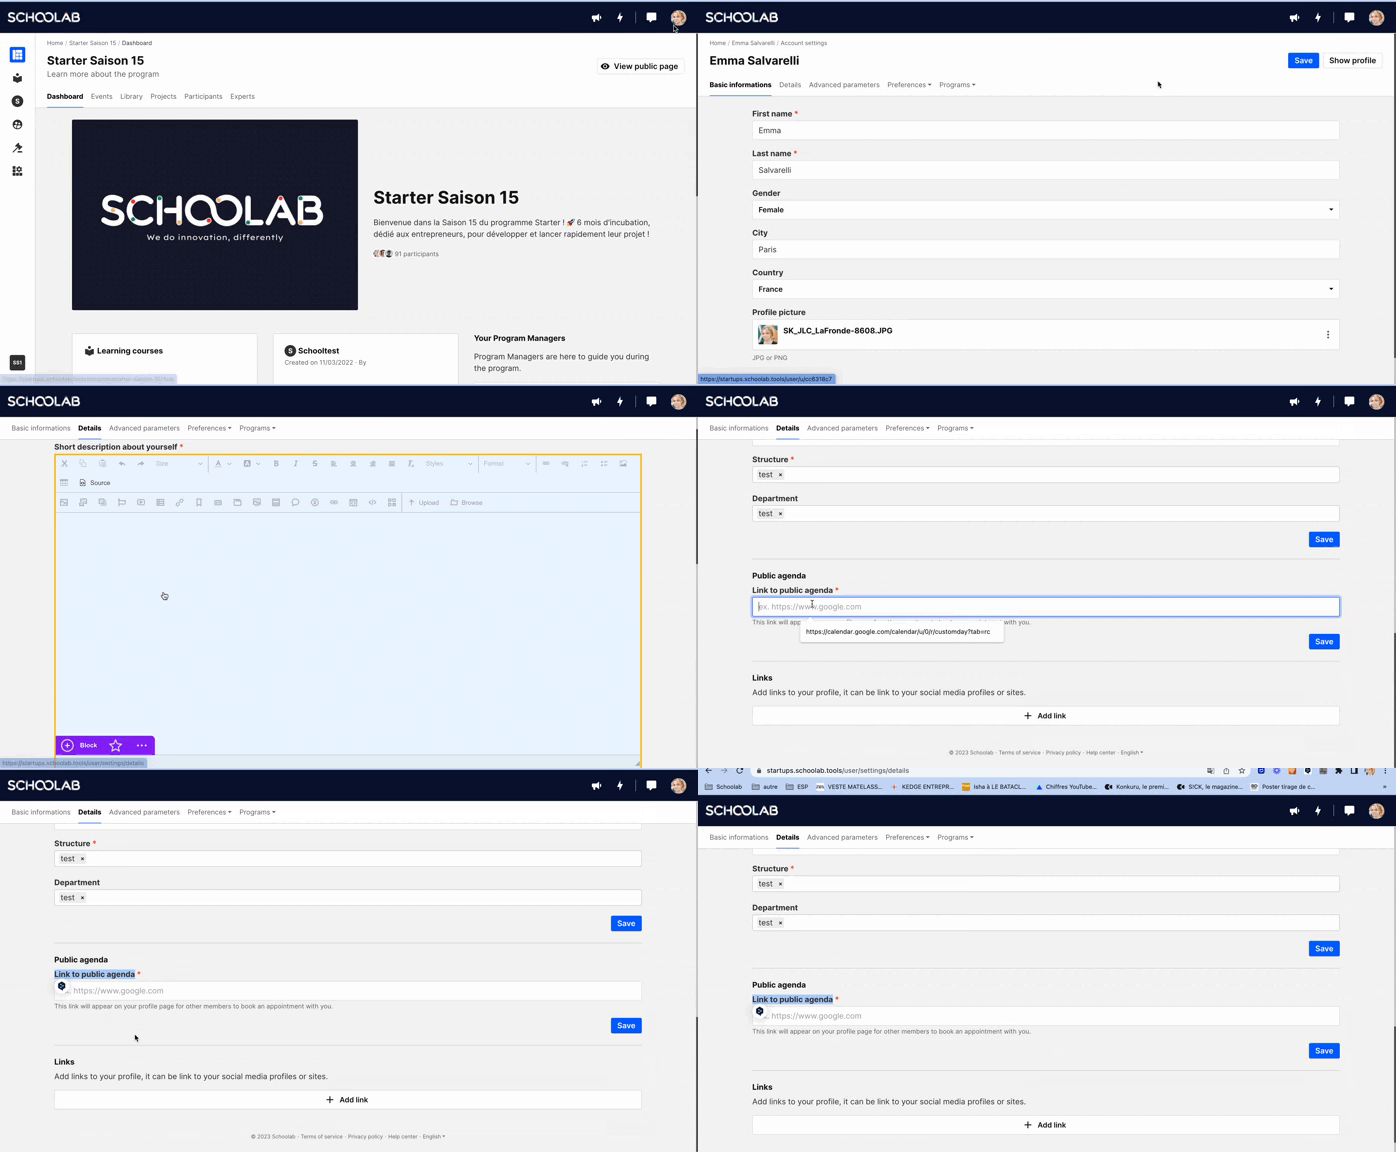
👉 Experts can add their calendar by going to their profile, in "Account settings" then in the "details" tab, you will find a line to add the appointment booking link.
--
2.The new Experts space
The experts space has been reworked, here are the new features:
👉 The Overview space: here, experts will find a summary of all the global information of their coaching: the brief of the experts, the summary of the number of coaching sessions and time spent, the list of projects they coach and the statements they are able to make, on the right all the documents that are shared with them, and below the newfeed.
👉 The Coaching space: here they will find all the coaching sessions they were able to declare. By hovering over the small cards, they will be able to see the notes left to PMs and those to participants. They will also be able to declare coaching sessions: another novelty, when they declare a coaching session they can now notify the participants by email.
👉 The project space: here they will find all the projects they coach and will be able to see a summary of their coaching session.
👉 The learning course space: here they will be able to see the training course followed by the participants, in order to have an eye on the topics covered.
--
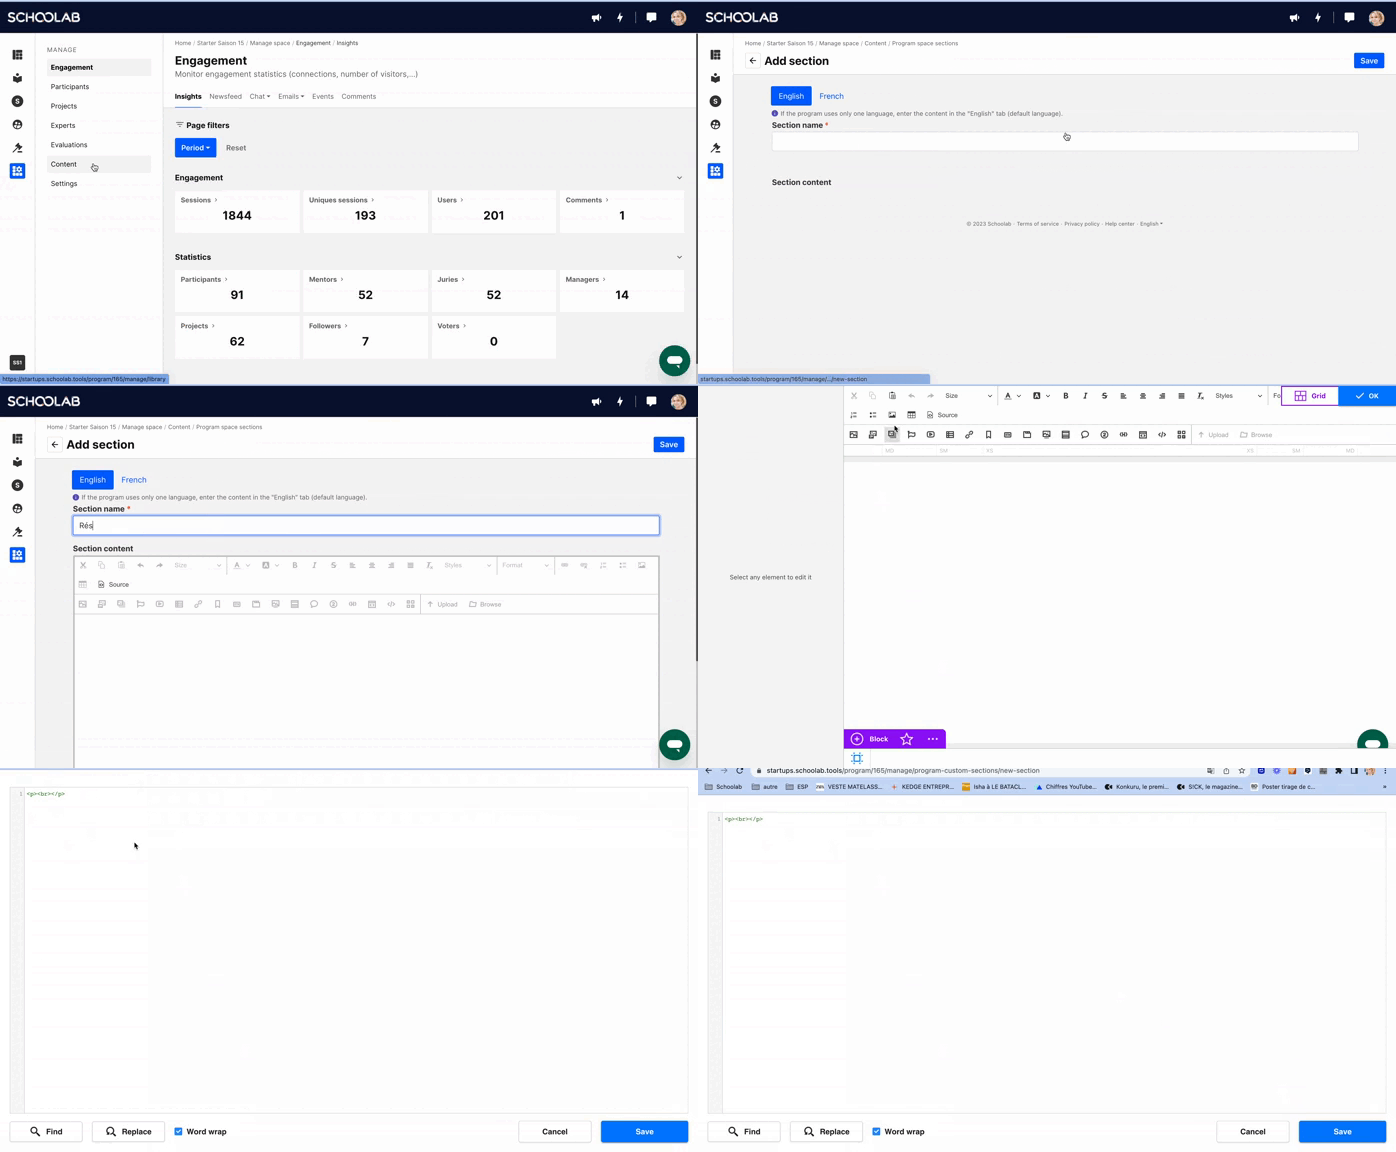
3.A new space to add
We have added the possibility to add a space according to your needs, for example, a FAQ, a booking space, it all depends on your tools. Here is how to do it:
👉 Go to "manage program."
👉 Go to the "content" tab then click on "program space sections"
👉 Here you will be able to integrate the tool of your choice, for that you just have to integrate the line of code of the tool by clicking on "source".
For this month of March, many new features have appeared on the platform:
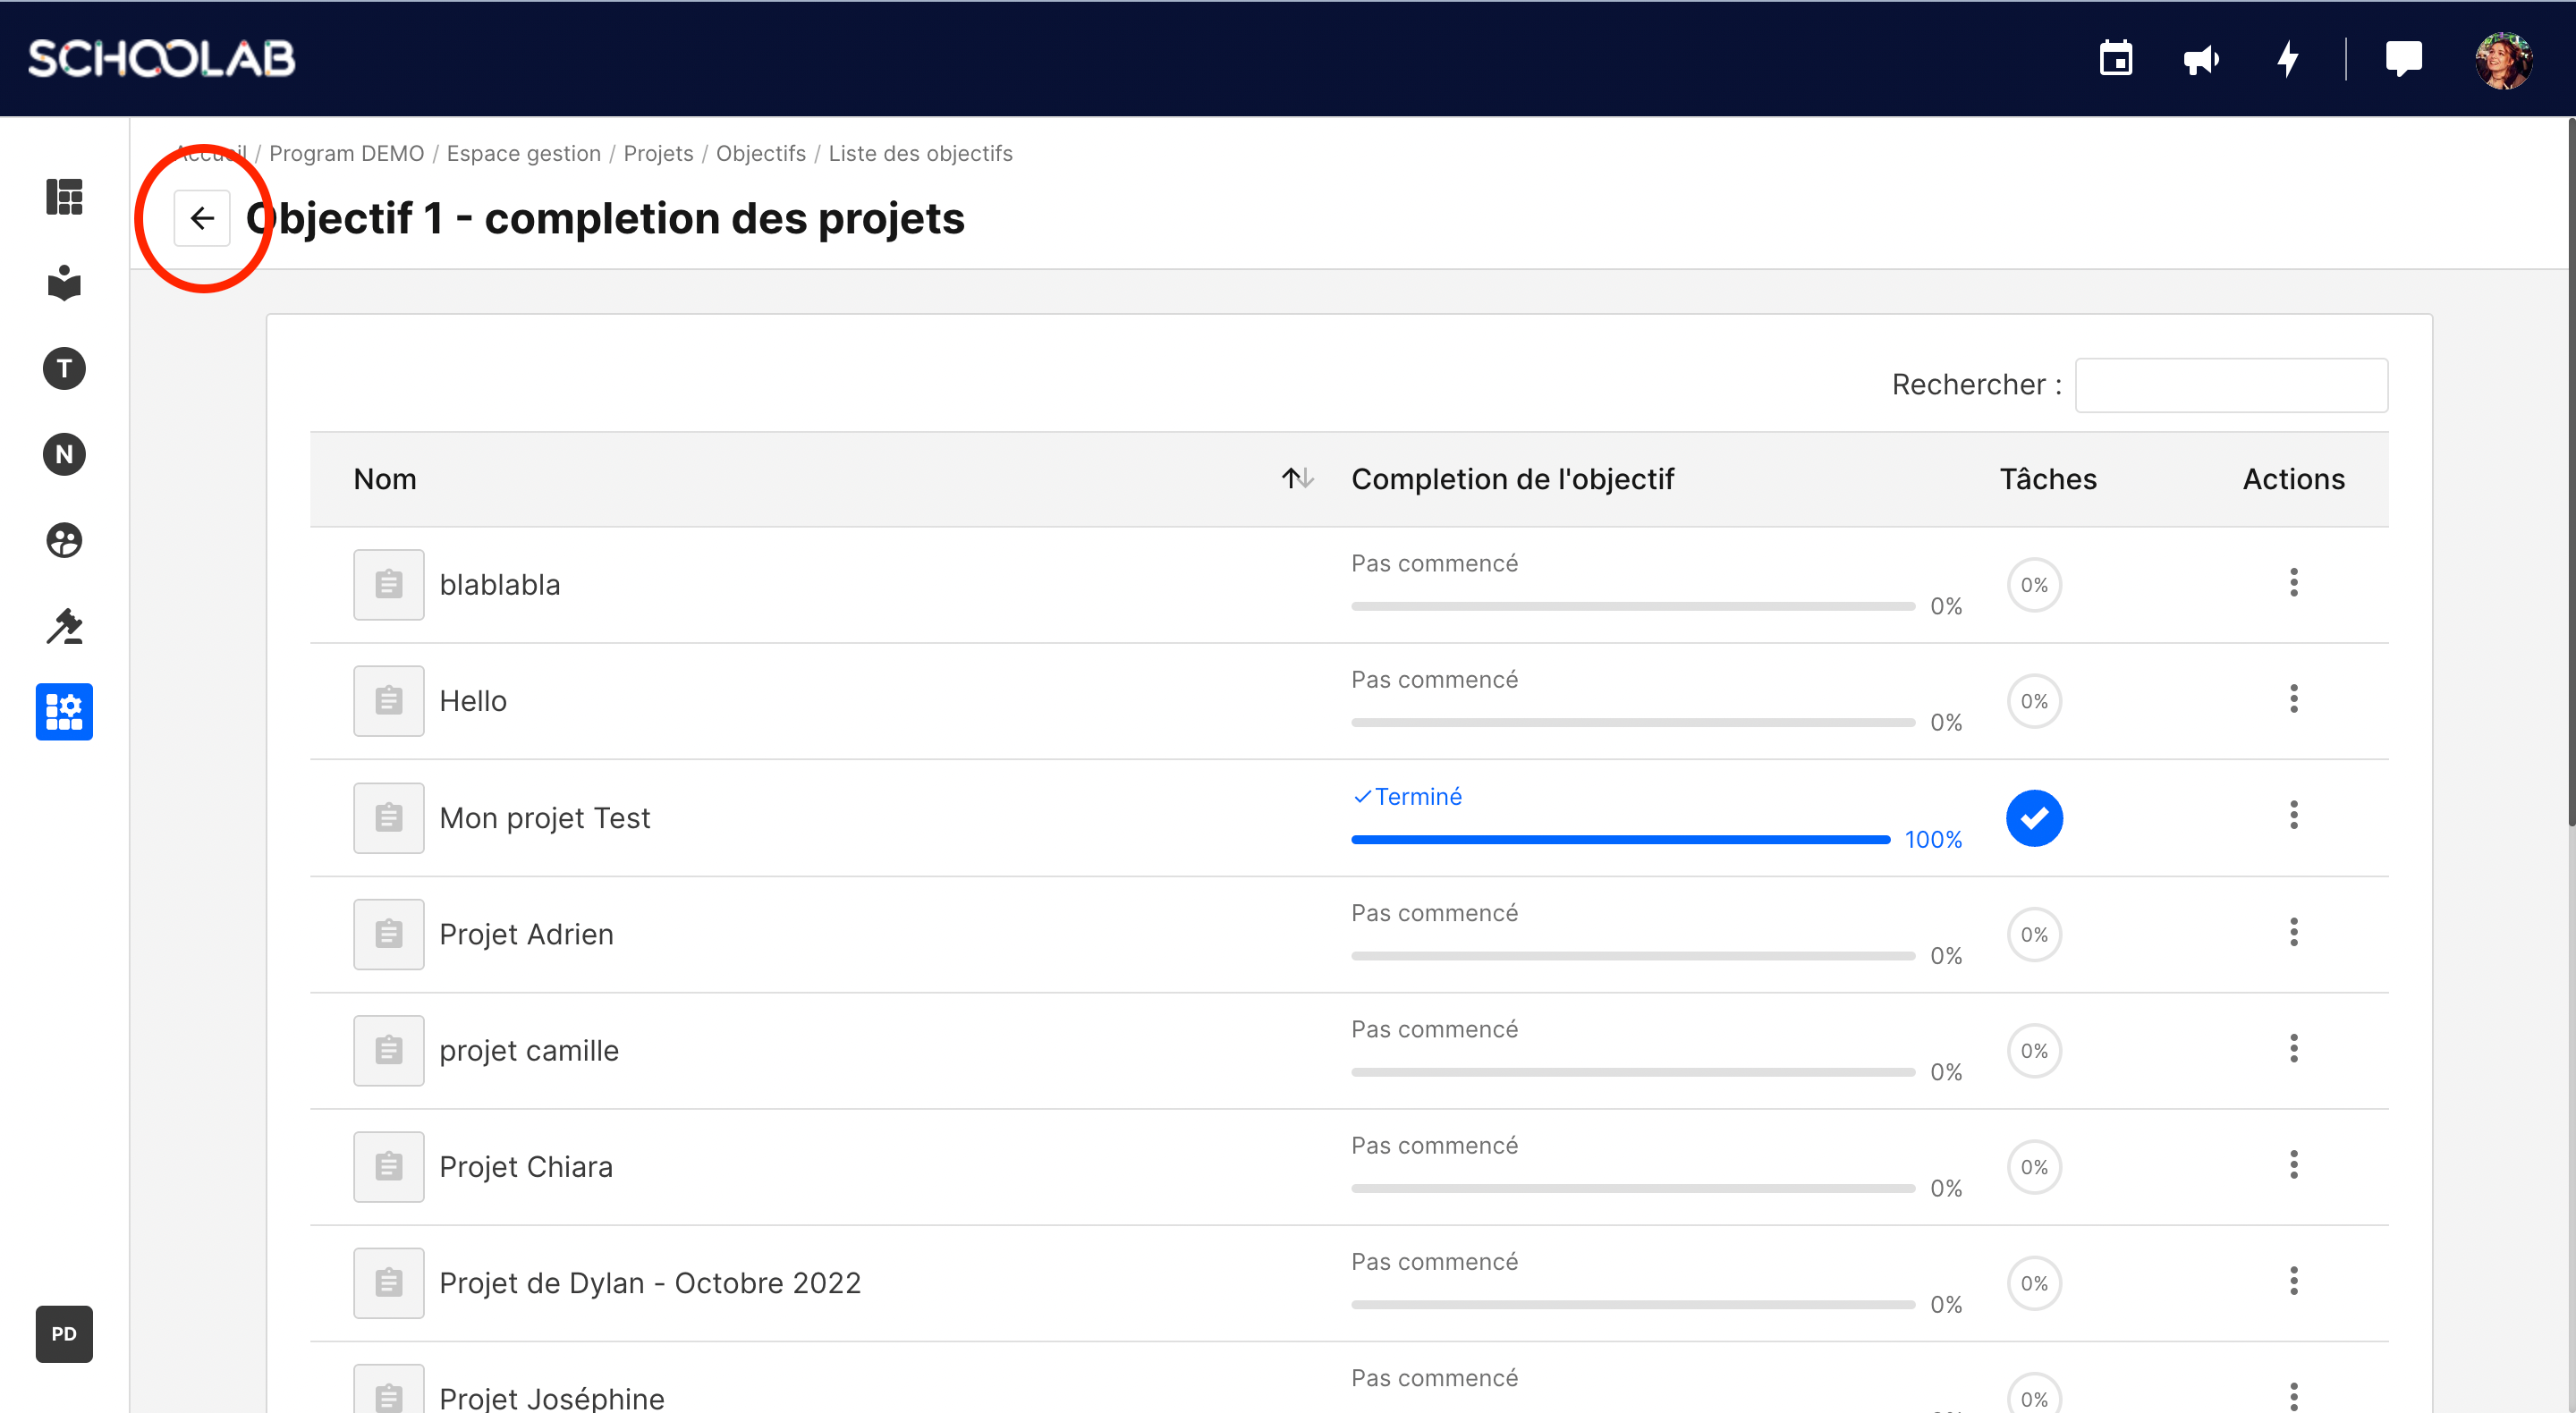
1.The back button
In order to facilitate the experience around the platform, we have added a back button, which will allow you to go back to the previous tabs more easily. You will find it in the evaluation sessions, on the public profiles, on the public area content, on the coaching session declarations, on the objectives and on the learning course.
-
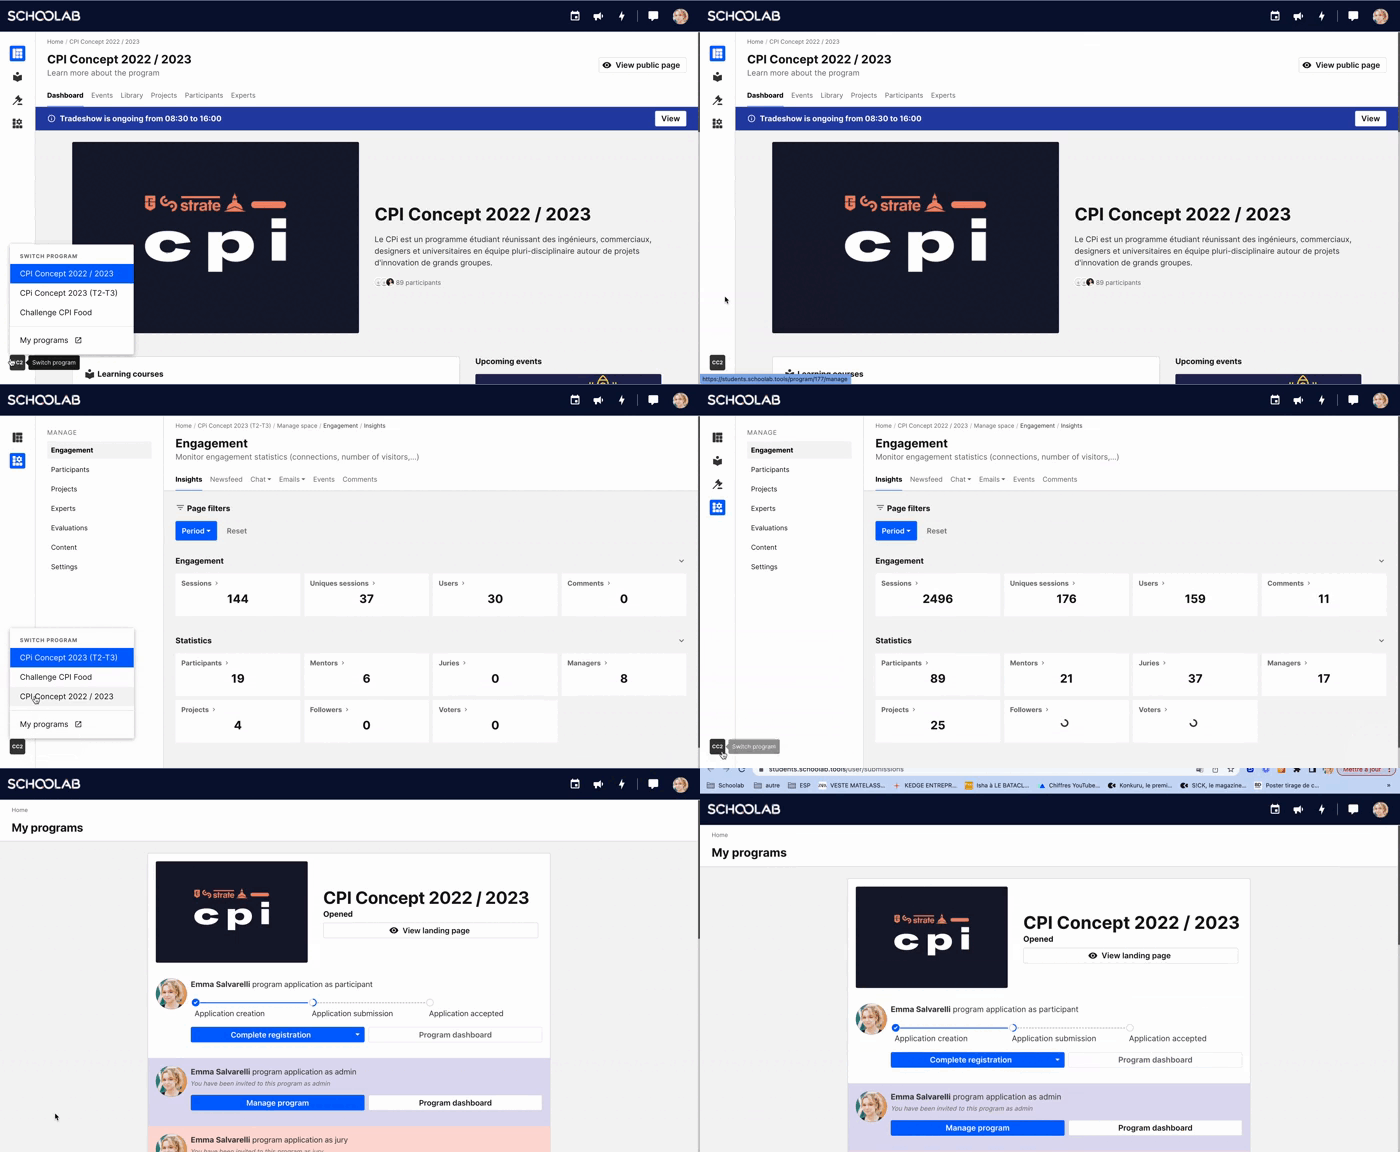
2.Program Switch
On the dashboard, at the bottom right of your screen, you will see a bookmark with initials. Click on it, and you can easily switch programs.
Thanks to this bookmark, you will be able to access your applications for the different programs by clicking on the "my programs" tab.
-
3. The new tags
Tags allow you to sort applications, participants and projects by different status.
You can set up automatic tags or manual tags, and they can be public or private.
What is a...
- manual tag? It's one that you add yourself.
- automatic tag ? It's one that you generate automatically through registration questionnaires or deliverables.
- public tag ? It is when it is visible on the user or project profile.
- private tag ? It is only visible to program mangers.
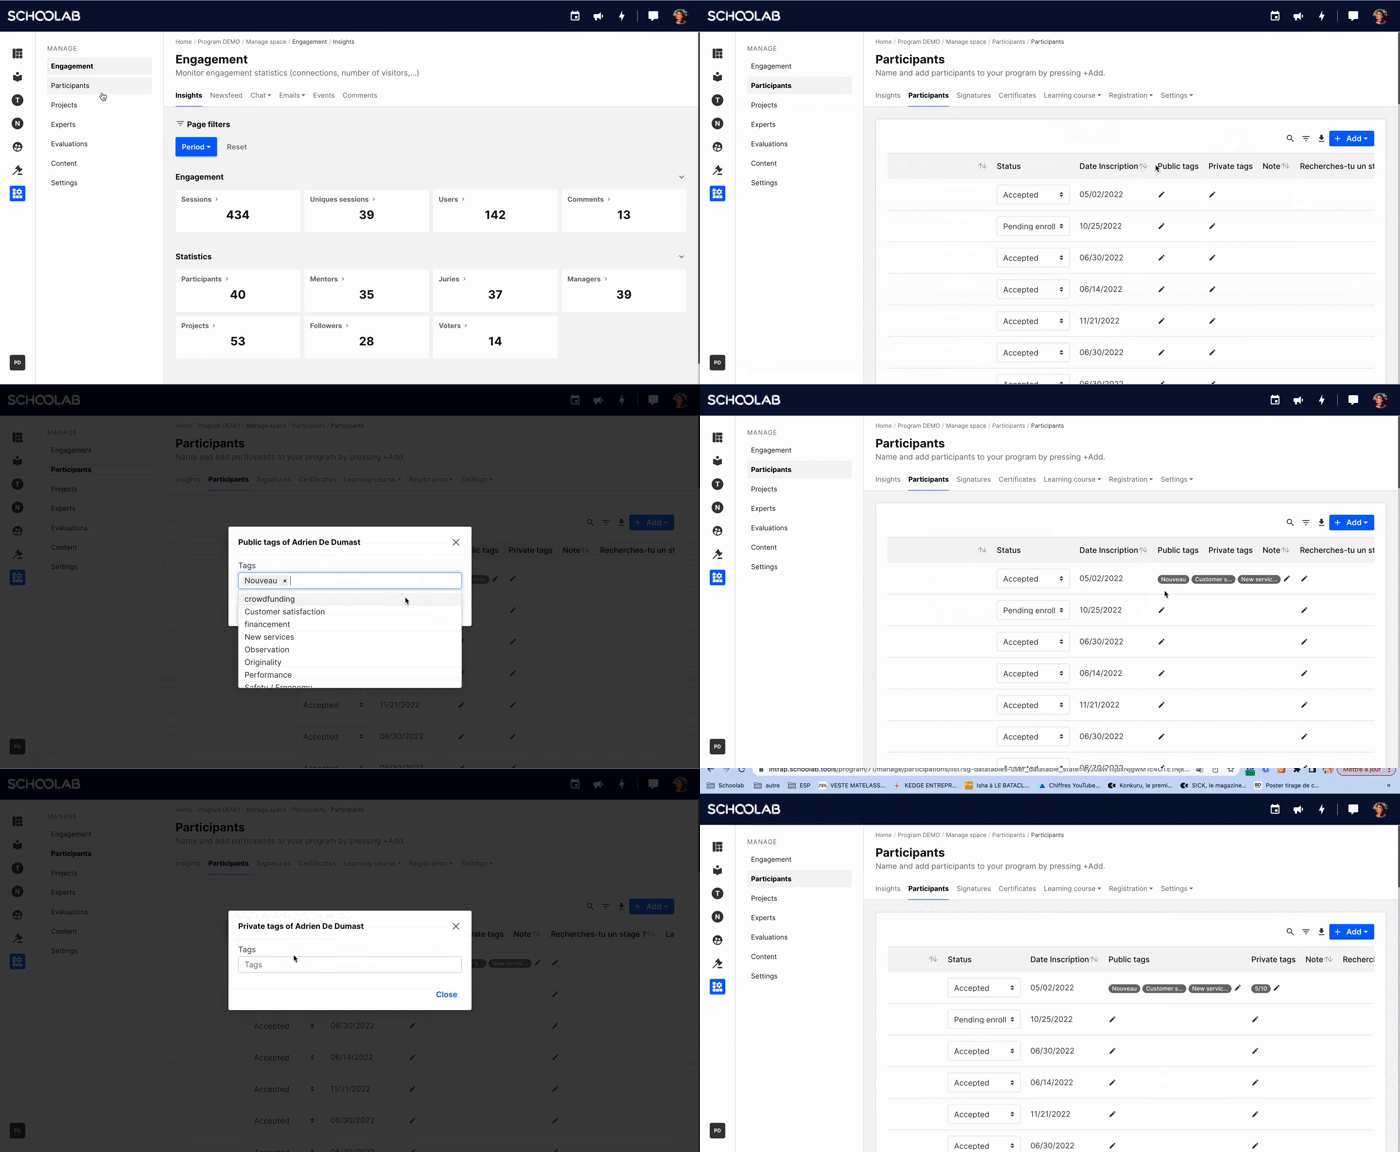
How to set up manual tags?
👉 Click on "manage the program".
Go to either applications, participants, projects, experts, juries, or even the admins list (Here we go to the participants list)
👉 On the right, you will find the columns "public tag", "private tag", click on the little pencil. A pop-up will appear, allowing you to choose an exciting tag or create a new one.
-
How to create an automatic tag?
👉Click on "manage program".
👉You can generate automatic tags either from registration form or deliverables. (Here we will go to the participant questionnaire).
👉When you create your form, you will be able to generate a filter from the multiple choice, single choice or checklist questions.
👉 In your field options, you will have to check the box "Create a "Tag" from the answers", so automatically the participant's answer will create a private tag.
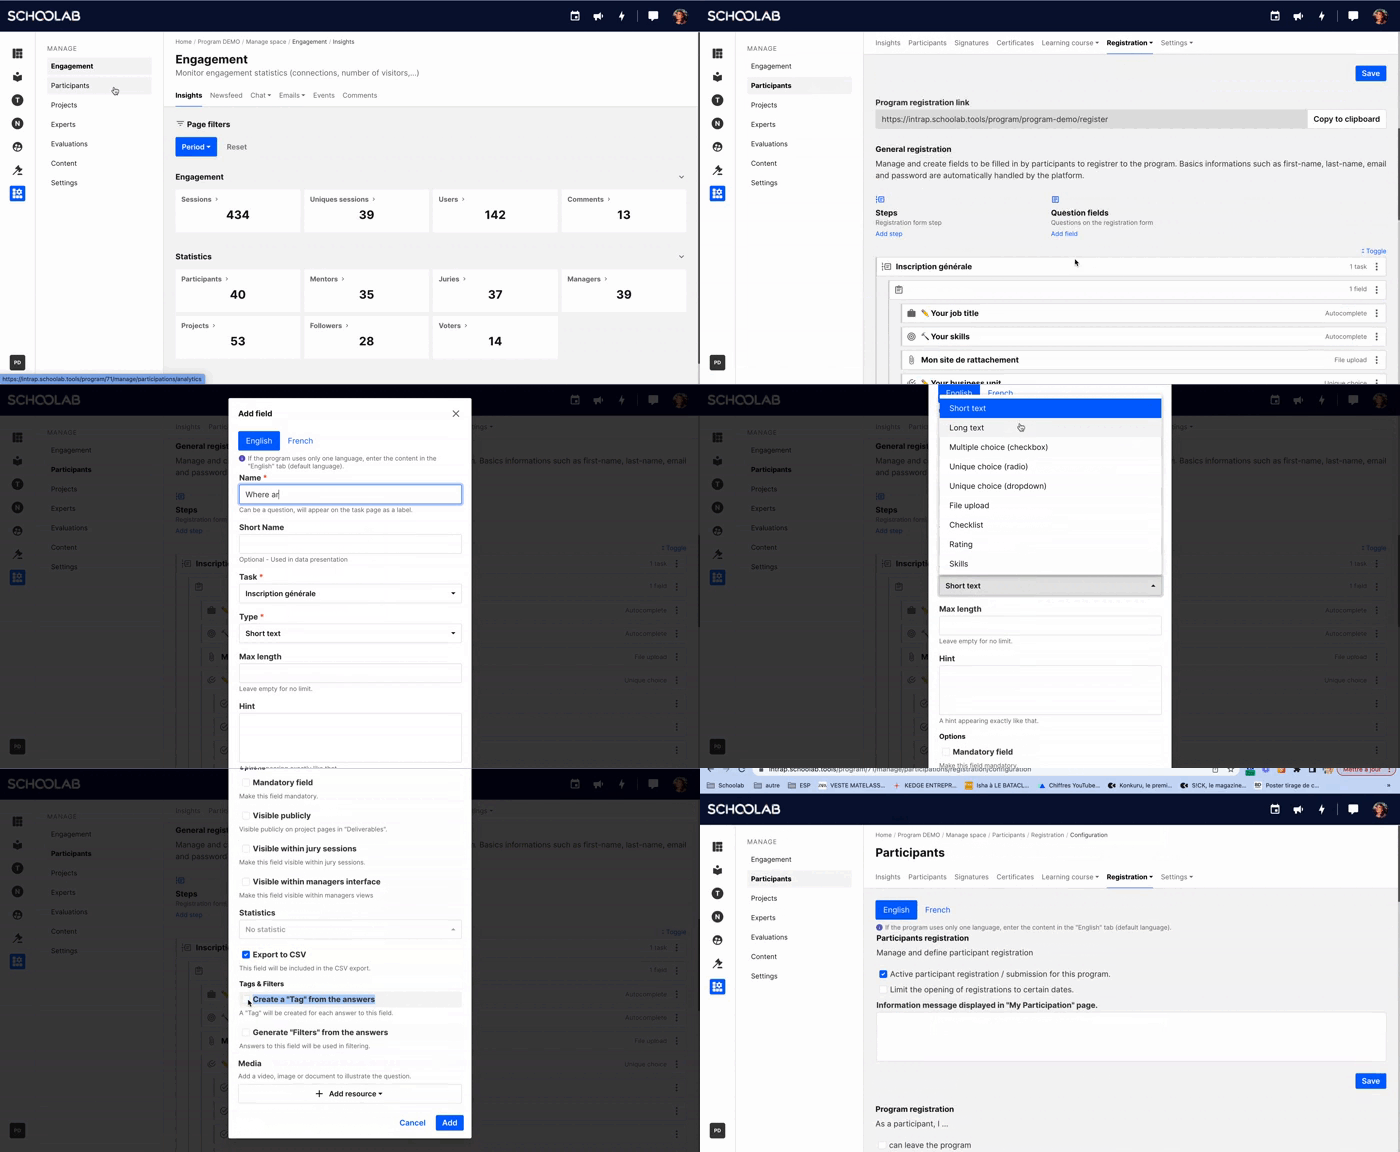
-
4.Access to participants' deliverables
If before there was only a tab for objective deliverables, we have created a dedicated space for participant deliverables for the learning course and applications.
Where to find the deliverables of the registration form?
👉 Click on "manage the program."
👉 Click on participants or projects, depending on the questionnaire you are interested in (Here we will go to the participant)
👉 Click on the "registration" tab and then the "deliverables" sub-tab. Here you will find the different deliverables, such as: links or documents. You can filter the deliverables by types and participants.
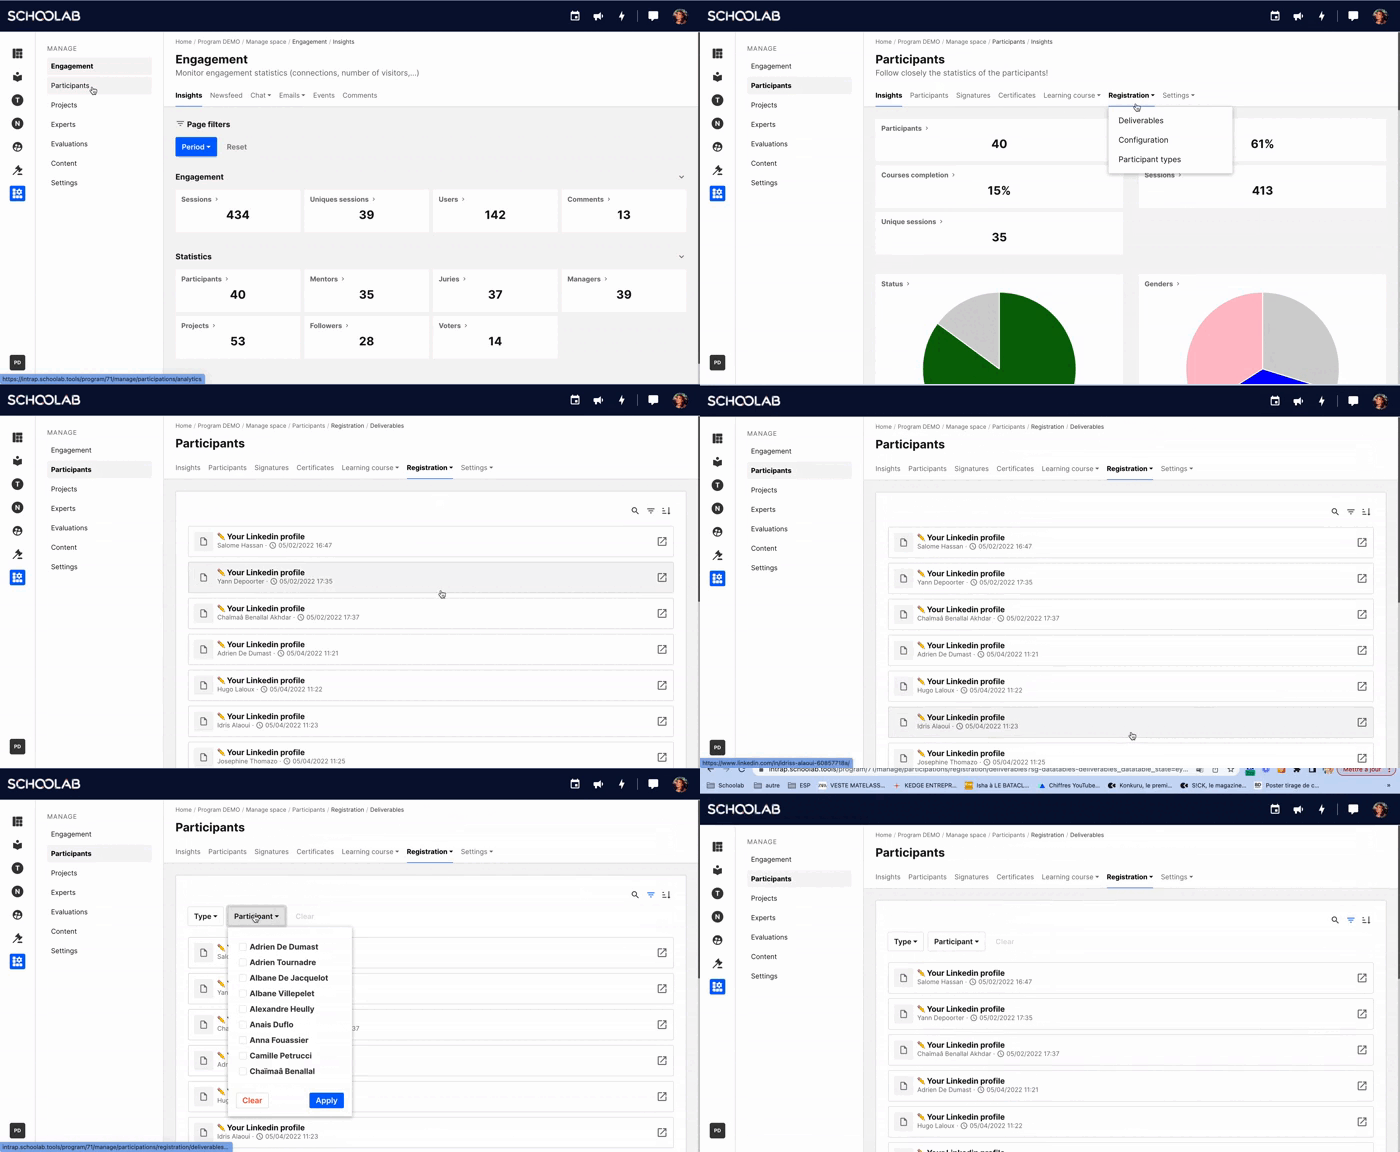
Where to find the learning course deliverables?
👉 Still in the "manage program" area, click on the Participan tab.
👉 Click on the tab "learning course" and then the sub-tab "deliverables".
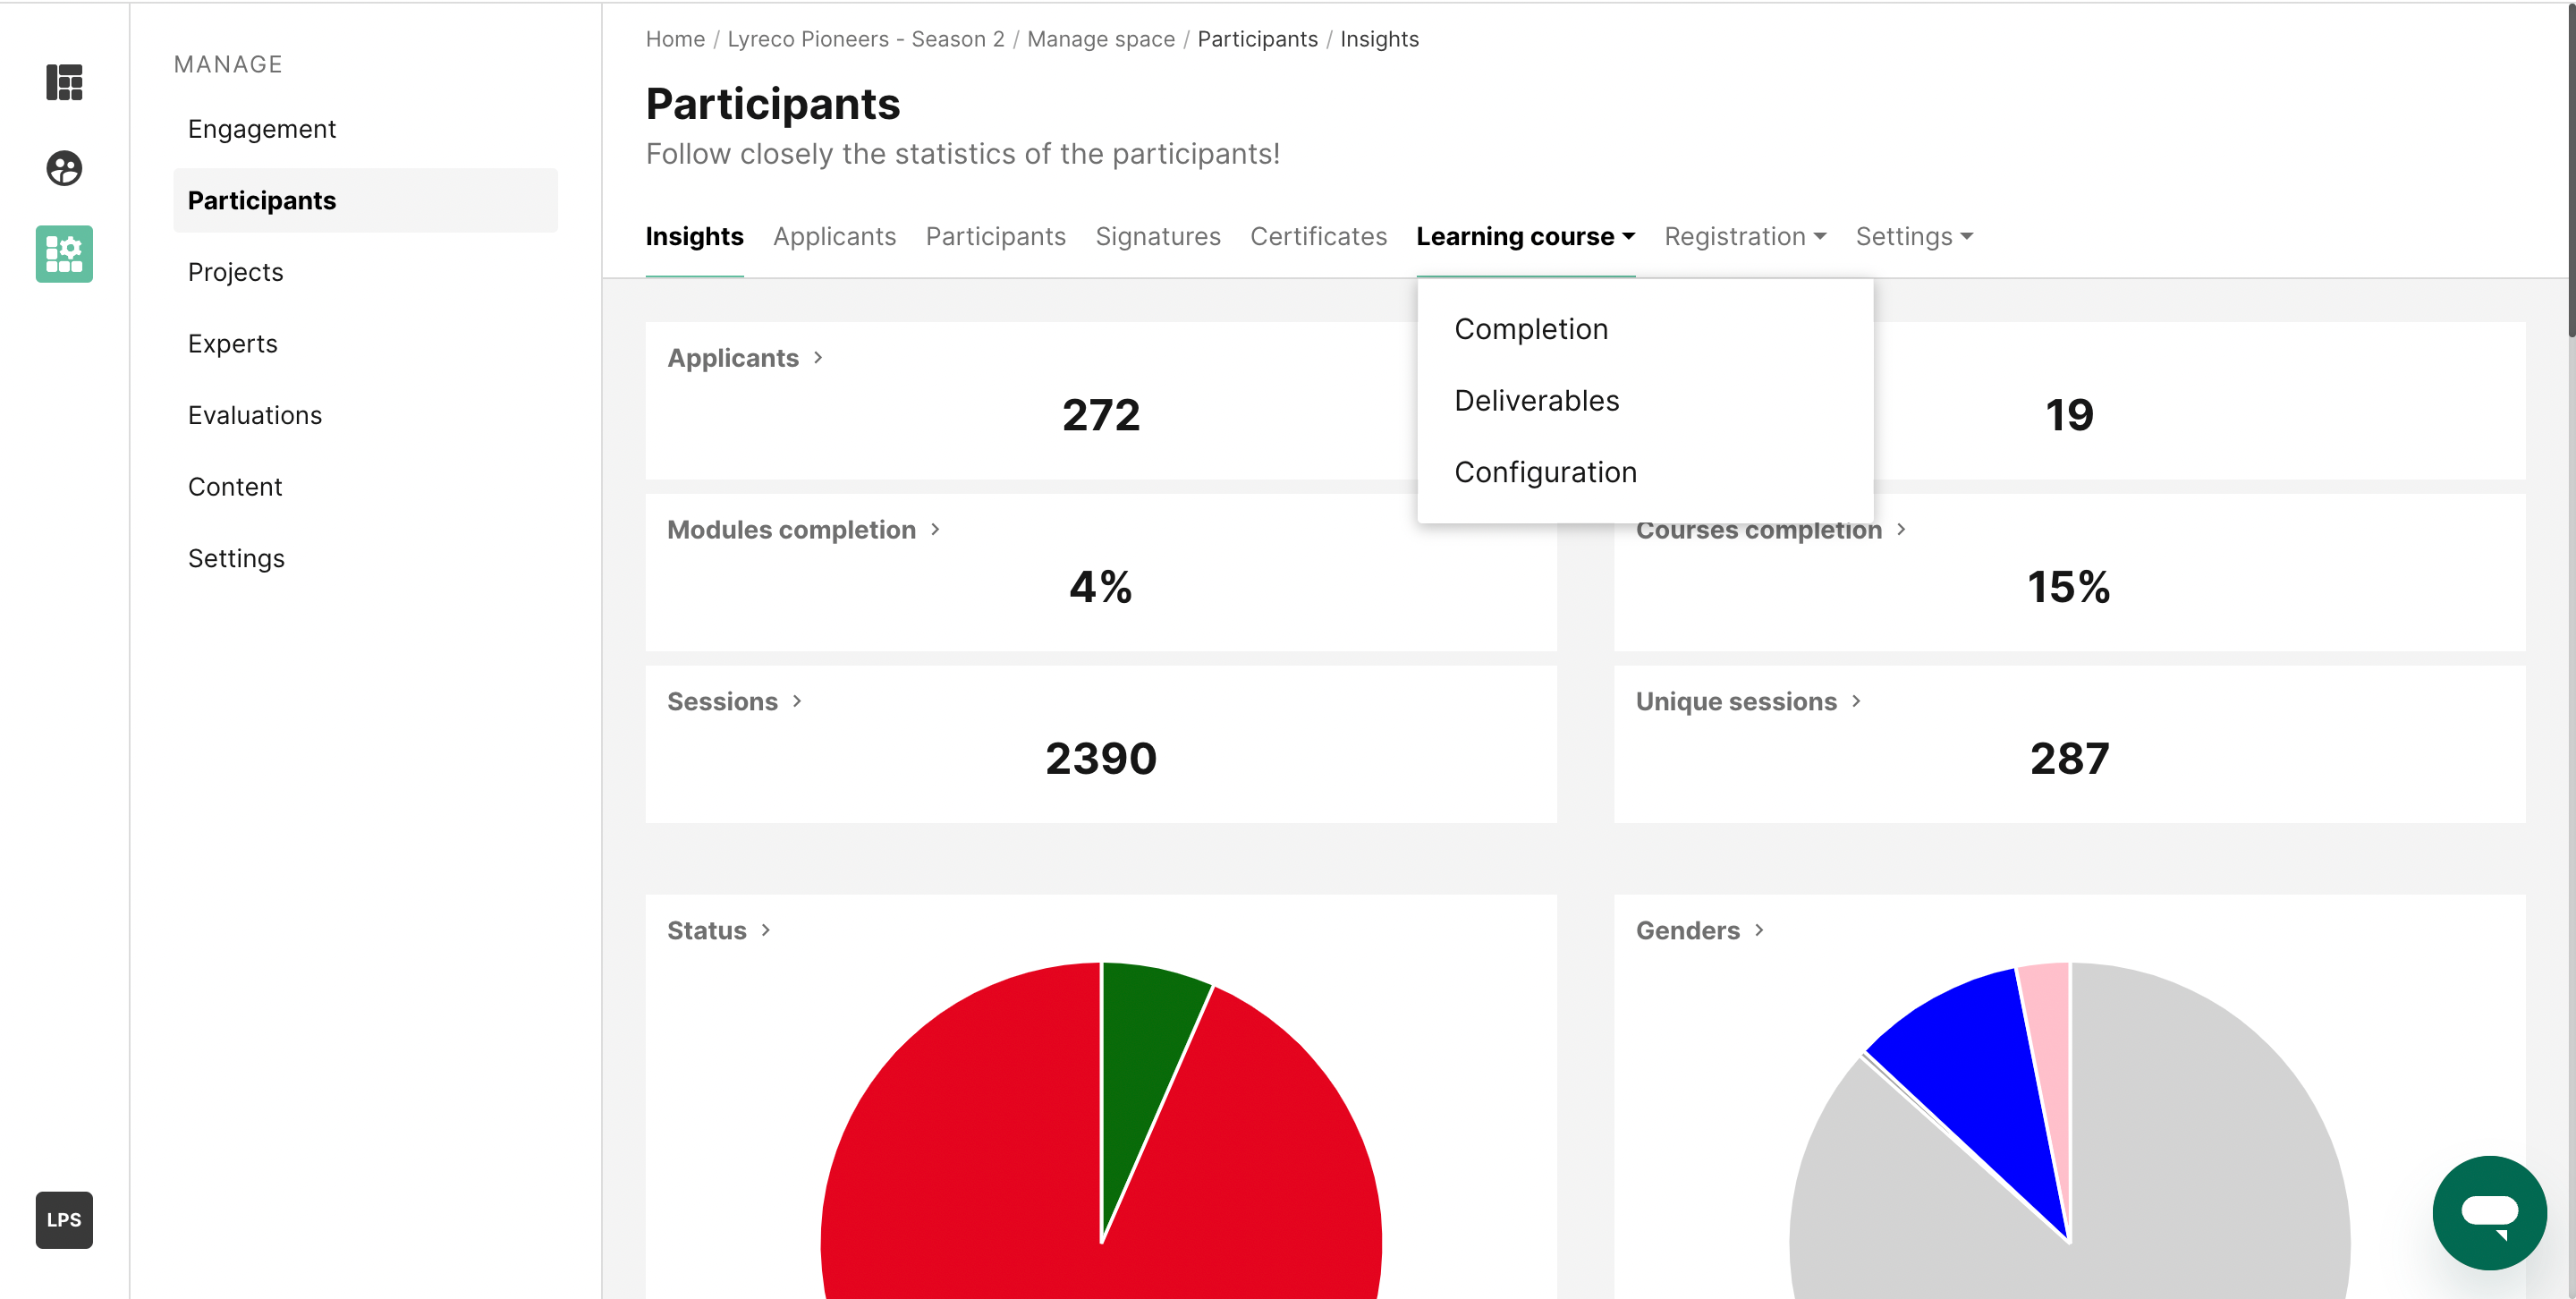
-
5.Preview learning area for experts
Today, it is possible for experts to access the learning course directly from their expert area, in order to follow the participants' progress.
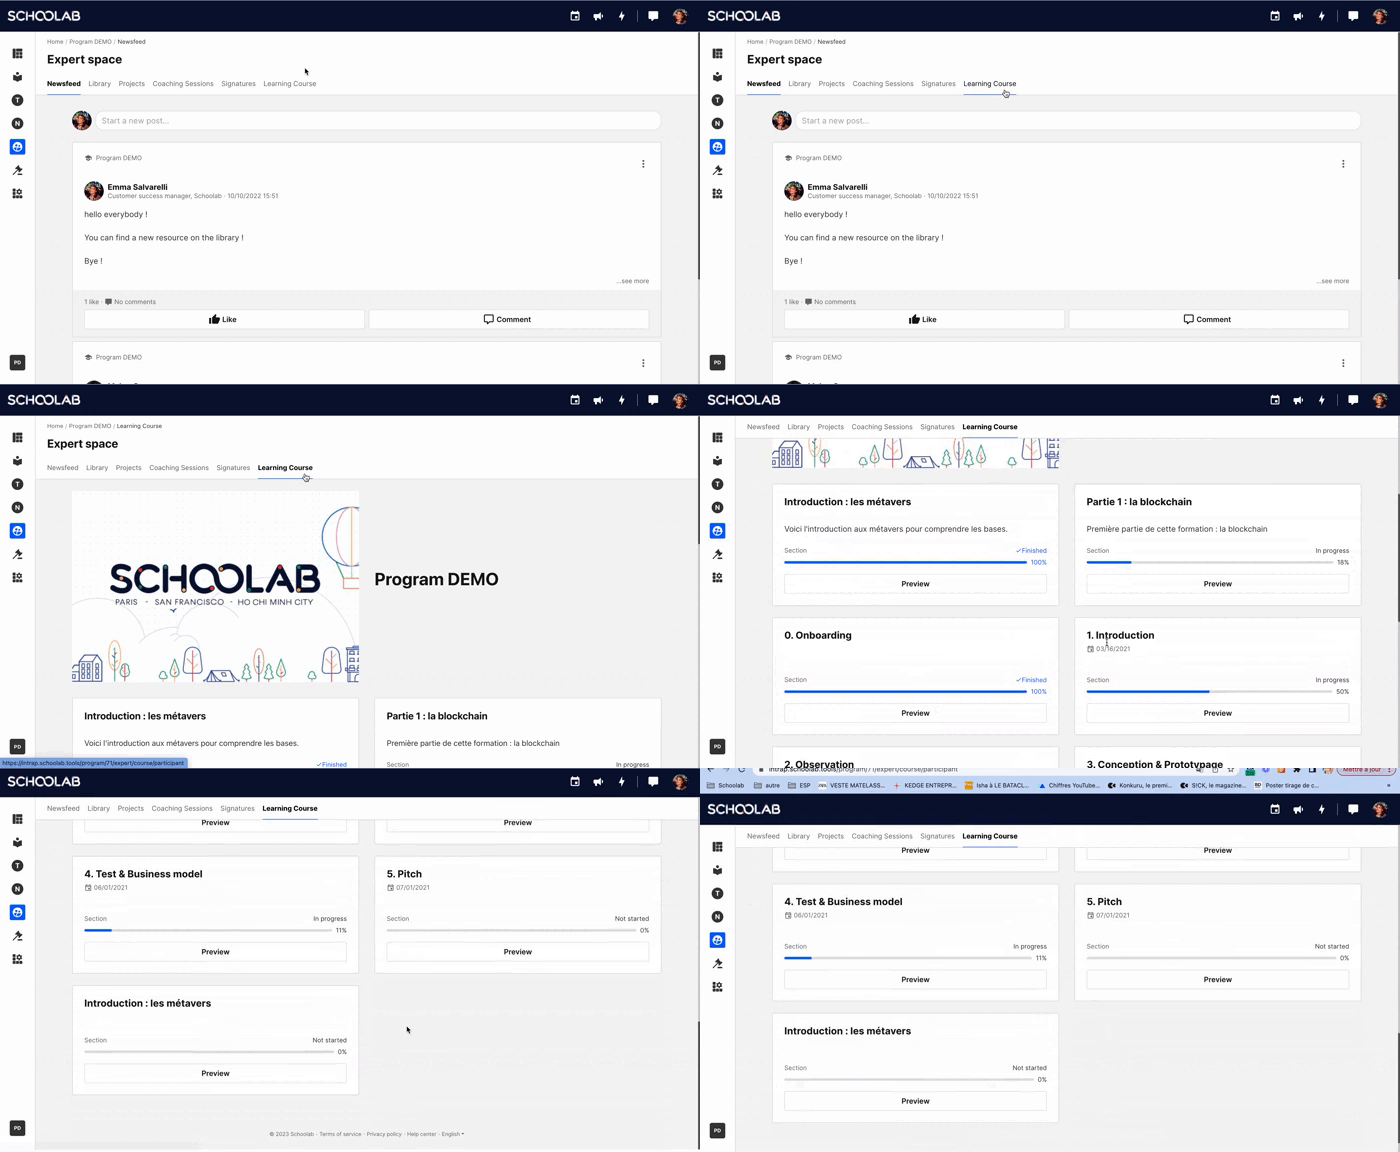
Load More
→